


原作者:Symfony 文档贡献者(原页结构化署名 Symfony)。阅读原文:Security。
版本与范围:Symfony 8.1 官方文档,要求 PHP 8.4.0 或更新版本(已核对官方发布页);current 为滚动链接,本次快照固定核验于 2026-10-05;原文核验日期:2026-10-05。本译稿覆盖原文章节及代码示例;示例输出来自原文,未在本地运行。
译者说明:本篇为原文全部技术正文的译文,保留 98 个代码、命令、差异补丁和输出块,以及官方原图。YAML 与 PHP 是同一配置的替代写法;有些代码还故意省略了应用逻辑。各节不是可以原样串接的独立成品。静态审查发现的具体问题紧邻相应代码标明,原文代码保持不变,未执行或声称运行测试。
Symfony 提供许多保护应用的工具。其中一些与 HTTP 有关的安全功能,例如安全的会话 Cookie 和 CSRF 防护,默认就已提供。本指南介绍的 SecurityBundle 则提供保护应用所需的身份认证与授权功能。
原文参考:secure session cookies;CSRF protection。
首先安装 SecurityBundle:
$ composer require symfony/security-bundle如果已经安装 Symfony Flex,还会自动创建 security.yaml 配置文件:
原文参考:Symfony Flex。
# config/packages/security.yaml
security:
    # https://symfony.com/doc/current/security.html#registering-the-user-hashing-passwords
    password_hashers:
        Symfony\Component\Security\Core\User\PasswordAuthenticatedUserInterface: 'auto'
    # https://symfony.com/doc/current/security.html#where-do-users-come-from-user-providers
    providers:
        users_in_memory: { memory: null }
    firewalls:
        dev:
            # 'assets/' is for AssetMapper, 'build/' for Webpack Encore.
            # (Note: no regex delimiters needed; Symfony adds `{}` automatically.)
            pattern: ^/(_profiler|_wdt|assets|build)/
            security: false
        main:
            lazy: true
            provider: users_in_memory

            # activate different ways to authenticate
            # https://symfony.com/doc/current/security.html#firewalls-authentication

            # https://symfony.com/doc/current/security/impersonating_user.html
            # switch_user: true

    # An easy way to control access for large sections of your site
    # Note: Only the *first* access control that matches will be used
    access_control:
        # - { path: ^/admin, roles: ROLE_ADMIN }
        # - { path: ^/profile, roles: ROLE_USER }
配置看起来很多。接下来的章节将分别介绍其中三个核心部分:
用户(providers)
应用中任何受保护的部分,都需要定义“用户”的概念。用户提供器根据用户标识符,例如电子邮箱地址,从数据库等存储中加载用户。
防火墙与用户认证(firewalls)
防火墙是安全体系的核心。处于防火墙范围内的每个请求,都会被检查是否需要已经认证的用户;防火墙也负责完成认证,例如处理登录表单。
访问控制,即授权(access_control)
通过访问控制和授权检查器,可以规定执行某个操作、访问某个 URL 所需的权限。
用户
在 Symfony 中,权限始终关联到一个用户对象。要保护整个应用或其中一部分,需要创建实现 UserInterface 的用户类。它通常是 Doctrine 实体,也可以是专门用于安全体系的用户类。
原文参考:UserInterface。
最简单的生成方式,是使用 MakerBundle 的 make:user 命令:
原文参考:MakerBundle。
$ php bin/console make:user
 The name of the security user class (e.g. User) [User]:
 > User

 Do you want to store user data in the database (via Doctrine)? (yes/no) [yes]:
 > yes

 Enter a property name that will be the unique "display" name for the user (e.g. email, username, uuid) [email]:
 > email

 Will this app need to hash/check user passwords? Choose No if passwords are not needed or will be checked/hashed by some other system (e.g. a single sign-on server).

 Does this app need to hash/check user passwords? (yes/no) [yes]:
 > yes

 created: src/Entity/User.php
 created: src/Repository/UserRepository.php
 updated: src/Entity/User.php
 updated: config/packages/security.yaml
// src/Entity/User.php
namespace App\Entity;
use App\Repository\UserRepository;
use Doctrine\ORM\Mapping as ORM;
use Symfony\Component\Security\Core\User\PasswordAuthenticatedUserInterface;
use Symfony\Component\Security\Core\User\UserInterface;
#[ORM\Entity(repositoryClass: UserRepository::class)]
#[ORM\Table(name: '`user`')]
#[ORM\UniqueConstraint(name: 'UNIQ_IDENTIFIER_EMAIL', fields: ['email'])]
class User implements UserInterface, PasswordAuthenticatedUserInterface
{
#[ORM\Id]
#[ORM\GeneratedValue]
#[ORM\Column]
private ?int $id = null;
#[ORM\Column(length: 180)]
private ?string $email = null;
/**
* @var list<string> The user roles
*/
#[ORM\Column]
private array $roles = [];
/**
* @var string The hashed password
*/
#[ORM\Column]
private ?string $password = null;
public function getId(): ?int
{
return $this->id;
}
public function getEmail(): ?string
{
return $this->email;
}
public function setEmail(string $email): static
{
$this->email = $email;
return $this;
}
/**
* A visual identifier that represents this user.
*
* @see UserInterface
*/
public function getUserIdentifier(): string
{
return (string) $this->email;
}
/**
* @see UserInterface
*/
public function getRoles(): array
{
$roles = $this->roles;
// guarantee every user at least has ROLE_USER
$roles[] = 'ROLE_USER';
return array_unique($roles);
}
/**
* @param list<string> $roles
*/
public function setRoles(array $roles): static
{
$this->roles = $roles;
return $this;
}
/**
* @see PasswordAuthenticatedUserInterface
*/
public function getPassword(): ?string
{
return $this->password;
}
public function setPassword(string $password): static
{
$this->password = $password;
return $this;
}
// [...]
}提示
可以为 make:user 传入 --with-uuid 或 --with-ulid。它会利用 Symfony Uid 组件,生成以 Uuid 或 Ulid 而不是 int 作为 id 类型的 User 实体。
原文参考:Uid Component;Uuid;Ulid。
如果像上例一样使用 Doctrine 实体,别忘了创建并执行迁移,以建立数据库表:
原文参考:creating and running a migration。
$ php bin/console make:migration
$ php bin/console doctrine:migrations:migrate
提示
给 make:migration 加上 --formatted,可以生成格式更整齐的迁移文件。
加载用户:用户提供器
除了创建实体,make:user 还会在安全配置中加入用户提供器配置:
# config/packages/security.yaml
security:
    # ...

    providers:
        app_user_provider:
            entity:
                class: App\Entity\User
                property: email
// config/packages/security.php
namespace Symfony\Component\DependencyInjection\Loader\Configurator;
use App\Entity\User;
return App::config([
'security' => [
// ...
'providers' => [
'app_user_provider' => [
'entity' => [
'class' => User::class,
'property' => 'email',
],
],
],
],
]);用户提供器知道如何根据用户标识符,例如邮箱或用户名,从数据库等存储中加载或重新加载用户。上面的配置使用 Doctrine,并把 email 属性作为标识符来查找 User 实体。
在安全生命周期中,用户提供器用于以下几个环节:
根据标识符加载用户
登录或其他认证过程中,提供器根据标识符加载用户。用户模拟与“记住我”等功能也使用这一机制。
原文参考:user impersonation;Remember Me。
从会话重新加载用户
每次请求开始时,系统从会话中加载用户,除非防火墙采用 stateless 模式。提供器会刷新用户,例如重新查询数据库,以保证用户信息是最新的;必要时,相关变化会导致用户失去认证状态并退出登录。后文“理解用户如何从会话刷新”会进一步解释这一过程。
Symfony 内置多种用户提供器:
实体用户提供器(Entity User Provider)
原文参考:Entity User Provider。
使用 Doctrine 从数据库加载用户。
原文参考:Doctrine。
LDAP 用户提供器
原文参考:LDAP User Provider。
从 LDAP 服务器加载用户。
内存用户提供器(Memory User Provider)
原文参考:Memory User Provider。
从配置文件加载用户。
链式用户提供器(Chain User Provider)
原文参考:Chain User Provider。
把两个或更多提供器组合成一个。每个防火墙只能关联一个用户提供器,因此可以用这种方式串联多个来源。
内置提供器已经覆盖常见需求,也可以创建自定义用户提供器。
原文参考:custom user provider。
注意
有时需要将用户提供器注入其他类,例如自定义认证器。所有用户提供器的服务 ID 都遵循 security.user.provider.concrete.<your-provider-name> 格式,其中 <your-provider-name> 是配置键,例如 app_user_provider。如果只有一个提供器,可以通过 UserProviderInterface 类型提示自动装配。
原文参考:UserProviderInterface。
注册用户:密码哈希
许多应用要求用户用密码登录。对于这些应用,SecurityBundle 提供密码哈希与校验功能。
首先,确保 User 类实现 PasswordAuthenticatedUserInterface:
原文参考:PasswordAuthenticatedUserInterface。
// src/Entity/User.php

// ...
use Symfony\Component\Security\Core\User\PasswordAuthenticatedUserInterface;

class User implements UserInterface, PasswordAuthenticatedUserInterface
{
    // ...

    /**
     * @see PasswordAuthenticatedUserInterface
     */
    public function getPassword(): ?string
    {
        return $this->password;
    }

    // ...
}
然后配置这个类应使用的密码哈希器。如果 security.yaml 尚未预先配置,make:user 应该已代为完成:
# config/packages/security.yaml
security:
    # ...
    password_hashers:
        # Use native password hasher, which auto-selects and migrates the best
        # possible hashing algorithm (which currently is "bcrypt")
        Symfony\Component\Security\Core\User\PasswordAuthenticatedUserInterface: 'auto'
// config/packages/security.php
namespace Symfony\Component\DependencyInjection\Loader\Configurator;
use Symfony\Component\Security\Core\User\PasswordAuthenticatedUserInterface;
return App::config([
'security' => [
// ...
// Use native password hasher, which auto-selects and migrates the best
// possible hashing algorithm (currently this is "bcrypt")
'password_hashers' => [
PasswordAuthenticatedUserInterface::class => 'auto',
],
],
]);Symfony 知道如何处理密码之后,就可以在把用户保存到数据库前,通过 UserPasswordHasherInterface 服务计算哈希:
// src/Controller/RegistrationController.php
namespace App\Controller;

// ...
use Symfony\Component\HttpFoundation\Response;
use Symfony\Component\PasswordHasher\Hasher\UserPasswordHasherInterface;

class RegistrationController extends AbstractController
{
    public function index(UserPasswordHasherInterface $passwordHasher): Response
    {
        // ... e.g. get the user data from a registration form
        $user = new User(...);
        $plaintextPassword = ...;

        // hash the password (based on the security.yaml config for the $user class)
        $hashedPassword = $passwordHasher->hashPassword(
            $user,
            $plaintextPassword
        );
        $user->setPassword($hashedPassword);

        // ...
    }
}
注意
如果用户类是 Doctrine 实体并使用密码哈希,其对应的 Doctrine 仓储类必须实现 PasswordUpgraderInterface。
原文参考:PasswordUpgraderInterface。
提示
make:registration-form 可以帮助生成注册控制器,并通过 SymfonyCastsVerifyEmailBundle 添加电子邮箱验证等功能。
原文参考:SymfonyCastsVerifyEmailBundle。
$ composer require symfonycasts/verify-email-bundle
$ php bin/console make:registration-form
也可以运行下面的命令,手动计算密码哈希:
$ php bin/console security:hash-password为避免把明文密码作为命令行参数传入,可以用 - 表示从标准输入读取:
译者静态审查:原文命令中的反斜杠会在常见 POSIX shell 中阻止 $PASSWORD 展开,实际传入字面量 $PASSWORD,而非变量内容。这一行保留用于忠实对照,不应照抄来哈希真实密码。优先使用交互式 security:hash-password 输入;如另写标准输入流程,须明确 shell 的引用规则,并避免明文进入命令历史或日志。
$ echo \$PASSWORD | php bin/console security:hash-password --no-interaction -Symfony 8.1
从标准输入读取密码的支持是在 Symfony 8.1 中引入的。
关于所有可用哈希器、指定具体哈希器以及密码迁移,参阅“密码哈希与验证”。
原文参考:Password Hashing and Verification。
防火墙
config/packages/security.yaml 中的 firewalls 是最重要的配置部分。这里的“防火墙”就是应用的认证系统:它决定应用的哪些范围进入安全体系,以及用户通过登录表单、API 令牌等何种方式进行认证。
# config/packages/security.yaml
security:
    # ...
    firewalls:
        # the order in which firewalls are defined is very important, as the
        # request will be handled by the first firewall whose pattern matches
        dev:
            # Ensure dev tools and static assets are always allowed
            pattern: ^/(_profiler|_wdt|assets|build)/
            security: false
        # a firewall with no pattern should be defined last because it will match all requests
        main:
            lazy: true
            # provider that you set earlier inside providers
            provider: app_user_provider

            # activate different ways to authenticate
            # https://symfony.com/doc/current/security.html#firewalls-authentication

            # https://symfony.com/doc/current/security/impersonating_user.html
            # switch_user: true
// config/packages/security.php
namespace Symfony\Component\DependencyInjection\Loader\Configurator;
return App::config([
'security' => [
// ...
'firewalls' => [
// the order in which firewalls are defined is very important, as the
// request will be handled by the first firewall whose pattern matches
'dev' => [
// Ensure dev tools and static assets are always allowed
'pattern' => '^/(_profiler|_wdt|assets|build)/',
'security' => false,
],
// a firewall with no pattern should be defined last because it will match all requests
'main' => [
'lazy' => true,
// provider that you set earlier inside providers
'provider' => 'app_user_provider',
// activate different ways to authenticate
// https://symfony.com/doc/current/security.html#firewalls-authentication
// https://symfony.com/doc/current/security/impersonating_user.html
// 'switch_user' => true,
],
],
],
]);每次请求只会启用一个防火墙。Symfony 根据 pattern 找到第一个匹配项,也可以按主机等其他条件匹配。在这里,所有实际页面都由 main 处理;没有 pattern 的防火墙会匹配全部 URL。
原文参考:match by host or other things。
dev 实际上是一个关闭安全处理的特殊防火墙,避免意外阻挡位于 /_profiler、/_wdt 等路径下的开发工具。
提示
要匹配多条路由,可以使用多个简单正则表达式组成的数组,无须编写一条很长的表达式:
# config/packages/security.yaml
security:
    # ...
    firewalls:
        dev:
            pattern:
                - ^/_profiler/
                - ^/_wdt/
                - ^/assets/
                - ^/build/
# ...
// config/packages/security.php
namespace Symfony\Component\DependencyInjection\Loader\Configurator;
return App::config([
'security' => [
// ...
'firewalls' => [
'dev' => [
'pattern' => [
'^/_profiler/',
'^/_wdt/',
'^/assets/',
'^/build/',
],
],
],
],
]);同一个防火墙可以支持多种认证方式,也就是用不同方式回答“你是谁”。用户首次访问网站时通常尚未登录。现在访问首页,仍然可以进入;工具栏会显示该页面位于防火墙范围内:
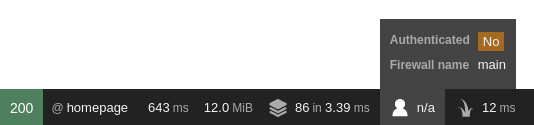
访问防火墙范围内的 URL,并不必然要求已经认证,例如登录表单必须允许访问,某些页面也可以公开。另一方面,需要识别已登录用户的页面必须处于同一个防火墙下。如果每页都要显示“你已作为某某登录”,就要把这些页面放在同一个防火墙的范围中。
后面的访问控制章节会说明如何限制防火墙范围内的 URL、控制器和其他资源。
提示
lazy 匿名模式会在没有授权需求时避免启动会话,也就是没有显式检查用户权限时不启动会话。这对于保持请求可缓存很重要,参阅 HTTP 缓存文档。
原文参考:HTTP Cache。
注意
如果看不到工具栏,可以安装 profiler:
原文参考:profiler。
$ composer require --dev symfony/profiler-pack取得当前请求匹配的防火墙配置
如需查询某个请求所匹配防火墙的配置,可以使用 Security 服务:
原文参考:Security。
// src/Service/ExampleService.php
// ...

use Symfony\Bundle\SecurityBundle\Security;
use Symfony\Component\HttpFoundation\RequestStack;

class ExampleService
{
    public function __construct(
        // Avoid calling getFirewallConfig() in the constructor: auth may not
        // be complete yet. Instead, store the entire Security object.
        private Security $security,
        private RequestStack $requestStack,
    ) {
    }

    public function someMethod(): void
    {
        $request = $this->requestStack->getCurrentRequest();
        $firewallName = $this->security->getFirewallConfig($request)?->getName();

        // ...
    }
}
认证用户
认证期间,系统尝试为当前访问者找到对应用户。传统方式是登录表单或浏览器的 HTTP Basic 对话框,不过 SecurityBundle 还提供多种认证器:
表单登录。
JSON 登录。
HTTP Basic。
登录链接。
X.509 客户端证书。
远程用户。
自定义认证器。
原文参考:Custom Authenticators。
提示
若应用通过 Google、Facebook 或 Twitter 等第三方服务登录,即社交登录,可以了解社区的 HWIOAuthBundle 或 Oauth2-client 包。
原文参考:HWIOAuthBundle;Oauth2-client。
表单登录
大多数网站通过表单,让用户用邮箱、用户名等标识符与密码登录。这项功能由内置的 FormLoginAuthenticator 提供。
原文参考:FormLoginAuthenticator。
下面的命令可以生成给应用添加登录表单所需的组件:
$ php bin/console make:security:form-login该命令创建控制器与模板,并更新安全配置。如果希望手动完成这些修改,可以按下面的步骤操作。
首先,为登录表单创建控制器:
$ php bin/console make:controller Login

 created: src/Controller/LoginController.php
 created: templates/login/index.html.twig
// src/Controller/LoginController.php
namespace App\Controller;
use Symfony\Bundle\FrameworkBundle\Controller\AbstractController;
use Symfony\Component\HttpFoundation\Response;
use Symfony\Component\Routing\Attribute\Route;
class LoginController extends AbstractController
{
#[Route('/login', name: 'app_login')]
public function index(): Response
{
return $this->render('login/index.html.twig', [
'controller_name' => 'LoginController',
]);
}
}然后通过 form_login 配置启用 FormLoginAuthenticator:
# config/packages/security.yaml
security:
    # ...

    firewalls:
        main:
            # ...
            form_login:
                # "app_login" is the name of the route created previously
                login_path: app_login
                check_path: app_login
// config/packages/security.php
namespace Symfony\Component\DependencyInjection\Loader\Configurator;
return App::config([
'security' => [
// ...
'firewalls' => [
'main' => [
'form_login' => [
// "app_login" is the name of the route created previously
'login_path' => 'app_login',
'check_path' => 'app_login',
],
],
],
],
]);注意
login_path 和 check_path 均支持 URL 与路由名,但不能包含没有默认值的必填通配参数,例如 foo 没有默认值的 /login/{foo}。
启用后,未认证访问者进入受保护资源时,会被安全系统重定向到 login_path。可以通过认证入口点定制这一行为。
原文参考:authentication entry points。
修改登录控制器,使其渲染登录表单:
// ...
+ use Symfony\Component\Security\Http\Authentication\AuthenticationUtils;

  class LoginController extends AbstractController
  {
      #[Route('/login', name: 'app_login')]
-     public function index(): Response
+     public function index(AuthenticationUtils $authenticationUtils): Response
      {
+         // get the login error if there is one
+         $error = $authenticationUtils->getLastAuthenticationError();
+
+         // last username entered by the user
+         $lastUsername = $authenticationUtils->getLastUsername();
+
          return $this->render('login/index.html.twig', [
-             'controller_name' => 'LoginController',
+             'last_username' => $lastUsername,
+             'error'         => $error,
          ]);
      }
  }
这个控制器只负责显示表单。FormLoginAuthenticator 会自动处理提交:如果邮箱或密码无效,认证器保存错误并重定向回来;控制器通过 AuthenticationUtils 读取错误,以便向用户展示。
最后创建或更新模板:
{# templates/login/index.html.twig #}
{% extends 'base.html.twig' %}

{# ... #}

{% block body %}
    {% if error %}
        <div>{{ error.messageKey|trans(error.messageData, 'security') }}</div>
    {% endif %}

    <form action="{{ path('app_login') }}" method="post">
        <label for="username">Email:</label>
        <input type="text" id="username" name="_username" value="{{ last_username }}" required>

        <label for="password">Password:</label>
        <input type="password" id="password" name="_password" required>

        {# If you want to control the URL the user is redirected to on success
        <input type="hidden" name="_target_path" value="/account"> #}

        <button type="submit">login</button>
    </form>
{% endblock %}
警告
传给模板的 error 是 AuthenticationException 实例,可能含有认证失败的敏感信息。绝不要使用 error.message,应像示例一样使用 messageKey;这个消息是可以安全展示的。
原文参考:AuthenticationException。
表单外观可以任意设计,但通常遵循这些约定:
<form> 元素向 app_login 路由发送 POST 请求,因为它正是 security.yaml 中 form_login.check_path 配置的目标。
用户名字段,或者邮箱等实际用户标识符字段,名称为 _username;密码字段名称为 _password。
提示
这些约定都可以在 form_login 下修改,详情见 SecurityBundle 安全配置参考。
原文参考:Security Configuration Reference (SecurityBundle)。
危险提示
到这一步,登录表单还没有 CSRF 防护。必须继续完成下面的“登录表单的 CSRF 防护”一节。
提交表单后,安全系统会自动读取 POST 参数 _username 和 _password,通过用户提供器加载用户,验证凭据;成功则完成认证,失败则返回登录表单并显示错误。
整个过程如下:
用户尝试访问受保护资源,例如 /admin。
防火墙把用户重定向到登录表单 /login,启动认证流程。
/login 页面通过本例创建的路由和控制器渲染表单。
用户把登录表单提交到 /login。
安全系统中的 FormLoginAuthenticator 拦截请求,检查提交的凭据。凭据正确就认证用户,否则让用户返回登录表单。
另请参阅
可以自定义登录成功和失败时的响应,详情见“自定义表单登录认证器的响应”。
原文参考:Customizing the Form Login Authenticator Responses。
登录表单的 CSRF 防护
可以在登录表单中加入隐藏的 CSRF 令牌,防止登录 CSRF 攻击。Security 组件已提供这项能力,但使用前需要完成配置。
原文参考:Login CSRF attacks。
首先,为表单登录启用 CSRF:
译者静态审查:原文在这里把防火墙名改为 secured_area,而前文实际使用 main。必须把 CSRF 配置放到处理登录请求的同一个防火墙下;照抄成另一个名称并不能为 main 的登录启用 CSRF。下面 YAML 与 PHP 块均保留原文名称用于对照。
# config/packages/security.yaml
security:
    # ...

    firewalls:
        secured_area:
            # ...
            form_login:
                # ...
                enable_csrf: true
// config/packages/security.php
namespace Symfony\Component\DependencyInjection\Loader\Configurator;
return App::config([
'security' => [
'firewalls' => [
'secured_area' => [
'form_login' => [
'enable_csrf' => true,
],
],
],
],
]);然后在 Twig 模板中调用 csrf_token() 生成令牌,并把它保存到表单隐藏字段。默认情况下,HTML 字段必须命名为 _csrf_token,生成令牌所用的字符串必须是 authenticate:
{# templates/login/index.html.twig #}

{# ... #}
<form action="{{ path('app_login') }}" method="post">
    {# ... the login fields #}

    <input type="hidden" name="_csrf_token" data-controller="csrf-protection" value="{{ csrf_token('authenticate') }}">

    <button type="submit">login</button>
</form>
完成后,登录表单便具备了 CSRF 防护。
提示
通过 csrf_parameter 可以更改字段名,通过 csrf_token_id 可以更改令牌 ID。详情见 SecurityBundle 安全配置参考。
原文参考:Security Configuration Reference (SecurityBundle)。
JSON 登录
有些应用提供由令牌保护的 API,并通过一个接收用户名或邮箱与密码的端点签发令牌。JSON 登录认证器可以帮助实现这一流程。
用 json_login 配置启用认证器:
# config/packages/security.yaml
security:
    # ...

    firewalls:
        main:
            # ...
            json_login:
                # api_login is a route we will create below
                check_path: api_login
// config/packages/security.php
namespace Symfony\Component\DependencyInjection\Loader\Configurator;
return App::config([
'security' => [
'firewalls' => [
'main' => [
'json_login' => [
// api_login is a route we will create below
'check_path' => 'api_login',
],
],
],
],
]);注意
check_path 支持 URL 与路由名,但不支持没有默认值的必填通配参数,例如 foo 没有默认值的 /login/{foo}。
客户端请求 check_path 时,认证器会运行。先为这一地址创建控制器:
$ php bin/console make:controller --no-template ApiLogin

 created: src/Controller/ApiLoginController.php
// src/Controller/ApiLoginController.php
namespace App\Controller;
use Symfony\Bundle\FrameworkBundle\Controller\AbstractController;
use Symfony\Component\HttpFoundation\Response;
use Symfony\Component\Routing\Attribute\Route;
class ApiLoginController extends AbstractController
{
#[Route('/api/login', name: 'api_login')]
public function index(): Response
{
return $this->json([
'message' => 'Welcome to your new controller!',
'path' => 'src/Controller/ApiLoginController.php',
]);
}
}只有认证器成功认证用户之后,才会调用这个登录控制器。此时可以取得用户、生成令牌或其他需要返回的内容,再构造 JSON 响应:
// ...
+ use App\Entity\User;
+ use Symfony\Component\Security\Http\Attribute\CurrentUser;

  class ApiLoginController extends AbstractController
  {
-     #[Route('/api/login', name: 'api_login')]
+     #[Route('/api/login', name: 'api_login', methods: ['POST'])]
-     public function index(): Response
+     public function index(#[CurrentUser] ?User $user): Response
      {
+         if (null === $user) {
+             return $this->json([
+                 'message' => 'missing credentials',
+             ], Response::HTTP_UNAUTHORIZED);
+         }
+
+         $token = ...; // somehow create an API token for $user
+
          return $this->json([
-             'message' => 'Welcome to your new controller!',
-             'path' => 'src/Controller/ApiLoginController.php',
+             'user'  => $user->getUserIdentifier(),
+             'token' => $token,
          ]);
      }
  }
注意
#[CurrentUser] 只能用于控制器参数中获取已认证用户。在服务里应调用 getUser()。
原文参考:getUser()。
流程可以归纳为以下几步:
客户端,例如前端,向 /api/login 发出带有 Content-Type: application/json 请求头的 POST 请求,包含 username 和 password 两个键。即使用户标识符实际上是邮箱,默认键名仍然是 username:
{
    "username": "dunglas@example.com",
    "password": "MyPassword"
}
安全系统拦截请求、检查凭据并认证用户。如果凭据不正确,返回 HTTP 401 Unauthorized 的 JSON 响应;正确则继续执行控制器。
控制器生成所需响应:
{
    "user": "dunglas@example.com",
    "token": "45be42..."
}
提示
JSON 请求的格式可以在 json_login 下配置,详情见 SecurityBundle 安全配置参考。
原文参考:Security Configuration Reference (SecurityBundle)。
HTTP Basic
HTTP Basic 是标准化的 HTTP 认证框架,通过浏览器对话框询问用户名和密码,再由 Symfony 的 HTTP Basic 认证器验证凭据。
原文参考:HTTP Basic authentication。
在防火墙中添加 http_basic 键即可启用:
# config/packages/security.yaml
security:
    # ...

    firewalls:
        main:
            # ...
            http_basic:
                realm: Secured Area
// config/packages/security.php
namespace Symfony\Component\DependencyInjection\Loader\Configurator;
return App::config([
'security' => [
'firewalls' => [
'main' => [
'http_basic' => [
'realm' => 'Secured Area',
],
],
],
],
]);当未认证用户访问受保护页面时,Symfony 通过 WWW-Authenticate 响应头,要求浏览器启动 HTTP Basic 认证。随后认证器检查凭据,并认证用户。
注意
HTTP Basic 认证器不能实现通常意义上的退出登录。即使退出 Symfony 会话,浏览器仍会记住凭据,并在之后的每个请求中继续发送。
登录链接
登录链接是一种免密码认证方式。用户通过电子邮件等渠道收到一个短期有效的链接,访问它即可完成网站认证。
完整用法见“如何使用免密码登录链接认证”。
原文参考:How to Use Passwordless Login Link Authentication。
访问令牌
访问令牌通常用于 API。用户从授权服务器取得令牌,并凭该令牌完成认证。
完整用法见“如何使用访问令牌认证”。
原文参考:How to use Access Token Authentication。
X.509 客户端证书
使用客户端证书时,Web 服务器负责实际认证。Symfony 的 X.509 认证器从客户端证书的可分辨名称 DN 中提取电子邮箱,再把它作为用户提供器中的用户标识符。
首先配置 Web 服务器,启用客户端证书验证,并把证书 DN 暴露给 Symfony 应用:
server {
    # ...

    ssl_client_certificate /path/to/my-custom-CA.pem;

    # enable client certificate verification
    ssl_verify_client optional;
    ssl_verify_depth 1;

    location / {
        # pass the DN as "SSL_CLIENT_S_DN" to the application
        fastcgi_param SSL_CLIENT_S_DN $ssl_client_s_dn;

        # ...
    }
}
# ...
SSLCACertificateFile "/path/to/my-custom-CA.pem"
SSLVerifyClient optional
SSLVerifyDepth 1
# pass the DN to the application
SSLOptions +StdEnvVarstls {
client_auth {
mode verify_if_given # check the Caddy documentation for more information
trusted_ca_cert_file /path/to/my-custom-CA.pem
}
}
route {
# Other configuration options go here
php_fastcgi unix//var/run/php/php-fpm.sock {
env SSL_CLIENT_S_DN {tls_client_subject}
# Environment variables for other certificate fields that you might need.
# They are not used by Symfony, but you can use them in your application.
# See all placeholders: https://caddyserver.com/docs/caddyfile/concepts#placeholders
env SSL_CLIENT_S_FINGERPRINT {tls_client_fingerprint}
env SSL_CLIENT_S_CERTIFICATE {tls_client_certificate_der_base64}
env SSL_CLIENT_S_ISSUER {tls_client_issuer}
env SSL_CLIENT_S_SERIAL {tls_client_serial}
env SSL_CLIENT_S_VERSION {tls_version}
}
}然后在防火墙中用 x509 启用认证器:
# config/packages/security.yaml
security:
    # ...

    firewalls:
        main:
            # ...
            x509:
                provider: your_user_provider
// config/packages/security.php
namespace Symfony\Component\DependencyInjection\Loader\Configurator;
return App::config([
'security' => [
'firewalls' => [
'main' => [
'x509' => [
'provider' => 'your_user_provider',
],
],
],
],
]);默认情况下,Symfony 用两种方式从 DN 提取邮箱:
首先尝试 Apache 提供的 SSL_CLIENT_S_DN_Email 服务器参数。
如果它不存在,例如使用 Nginx 时,则读取 SSL_CLIENT_S_DN,并匹配 emailAddress 后面的值。
可以在 x509 下定制部分参数名,详情参阅 x509 配置参考。
原文参考:the x509 configuration reference。
远程用户
除客户端证书认证外,还有其他 Web 服务器模块会预先认证用户,例如 Kerberos。远程用户认证器为这些服务提供基本集成。
这些模块通常将已经认证的用户名写入 REMOTE_USER 环境变量。远程用户认证器把它作为用户标识符,加载对应用户。
通过 remote_user 配置启用远程用户认证:
# config/packages/security.yaml
security:
    firewalls:
        main:
            # ...
            remote_user:
                provider: your_user_provider
// config/packages/security.php
namespace Symfony\Component\DependencyInjection\Loader\Configurator;
return App::config([
'security' => [
'firewalls' => [
'main' => [
'remote_user' => [
'provider' => 'your_user_provider',
],
],
],
],
]);提示
可以在 remote_user 下定制服务器变量名称,详情见配置参考。
原文参考:the configuration reference。
限制登录尝试次数
Symfony 借助 Rate Limiter 组件,为登录暴力破解提供基本防护。如果应用尚未使用该组件,应先安装:
原文参考:brute force login attacks;Rate Limiter component。
$ composer require symfony/rate-limiter然后通过 login_throttling 启用:
译者静态审查:下面三个 login_throttling 是三种替代方案,不可在同一个映射中同时保留。重复 YAML 键可能被拒绝;PHP 数组重复键会由后值覆盖前值。应只选一项,再配置对应服务。
# config/packages/security.yaml
security:

    firewalls:
        # ...

        main:
            # ...

            # by default, the feature allows 5 login attempts per minute
            login_throttling: null

            # configure the maximum login attempts
            login_throttling:
                max_attempts: 3          # per minute ...
                # interval: '15 minutes' # ... or in a custom period

            # use a custom rate limiter via its service ID
            login_throttling:
                limiter: app.my_login_rate_limiter
// config/packages/security.php
namespace Symfony\Component\DependencyInjection\Loader\Configurator;
return App::config([
'security' => [
'firewalls' => [
'main' => [
// by default, the feature allows 5 login attempts per minute
'login_throttling' => null,
// configure the maximum login attempts
'login_throttling' => [
'max_attempts' => 3, // per minute ...
'interval' => '15 minutes', // ... or in a custom period
],
// use a custom rate limiter via its service ID
'login_throttling' => [
'limiter' => 'app.my_login_rate_limiter',
],
],
],
],
]);注意
interval 的值必须是数字加上 PHP 相对日期格式支持的单位,例如 3 seconds、10 hours 或 1 day。
原文参考:PHP date relative formats。
内部使用 Rate Limiter,默认通过 Symfony 缓存保存历史登录尝试。可以指定缓存池或自定义存储服务:
原文参考:Rate Limiter component;custom storage service。
# config/packages/security.yaml
security:
    firewalls:
        main:
            login_throttling:
                # use a specific cache pool for storing limiter state
                cache_pool: 'cache.rate_limiter'
                # or use a custom storage service (takes precedence over cache_pool)
                # storage_service: 'app.my_custom_storage'
// config/packages/security.php
use Symfony\Config\SecurityConfig;
return static function (SecurityConfig $security): void {
$mainFirewall = $security->firewall('main');
$mainFirewall->loginThrottling()
// use a specific cache pool for storing limiter state
->cachePool('cache.rate_limiter')
// or use a custom storage service (takes precedence over cache_pool)
// ->storageService('app.my_custom_storage')
;
};限制同时作用于两种维度:“IP 地址加用户名”的失败请求数不超过 max_attempts,默认值为 5;同一 IP 地址的失败请求数不超过 5 × max_attempts。第二层限制用于防止攻击者切换用户名绕过第一层,同时尽量减少对办公室等大型共享网络正常用户的影响。
提示
限制失败登录只是防御暴力破解的一项基础措施。OWASP 的暴力破解攻击指南列出其他防护方式,应按实际保护需求选用。
原文参考:OWASP Brute Force Attacks。
如果需要更复杂的限流算法,可以创建实现 RequestRateLimiterInterface 的类,也可以使用 DefaultLoginRateLimiter,再把 limiter 配置为该服务 ID:
原文参考:RequestRateLimiterInterface;DefaultLoginRateLimiter。
# config/packages/security.yaml
framework:
    rate_limiter:
        # define 2 rate limiters (one for username+IP, the other for IP)
        username_ip_login:
            policy: token_bucket
            limit: 5
            rate: { interval: '5 minutes' }

        ip_login:
            policy: sliding_window
            limit: 50
            interval: '15 minutes'

services:
    # our custom login rate limiter
    app.login_rate_limiter:
        class: Symfony\Component\Security\Http\RateLimiter\DefaultLoginRateLimiter
        arguments:
            # globalFactory is the limiter for IP
            $globalFactory: '@limiter.ip_login'
            # localFactory is the limiter for username+IP
            $localFactory: '@limiter.username_ip_login'
            $secret: '%kernel.secret%'

security:
    firewalls:
        main:
            # use a custom rate limiter via its service ID
            login_throttling:
                limiter: app.login_rate_limiter
// config/packages/security.php
namespace Symfony\Component\DependencyInjection\Loader\Configurator;
use Symfony\Component\Security\Http\RateLimiter\DefaultLoginRateLimiter;
return App::config([
'framework' => [
'rate_limiter' => [
// define 2 rate limiters (one for username+IP, the other for IP)
'username_ip_login' => [
'policy' => 'token_bucket',
'limit' => 5,
'rate' => ['interval' => '5 minutes'],
],
'ip_login' => [
'policy' => 'sliding_window',
'limit' => 50,
'interval' => '15 minutes',
],
],
],
new ServicesConfig(
services: [
// our custom login rate limiter
'app.login_rate_limiter' => [
'class' => DefaultLoginRateLimiter::class,
'arguments' => [
// globalFactory is the limiter for IP
'$globalFactory' => service('limiter.ip_login'),
// localFactory is the limiter for username+IP
'$localFactory' => service('limiter.username_ip_login'),
// secret is the app secret
'$secret' => param('kernel.secret'),
],
],
],
),
'security' => [
'firewalls' => [
'main' => [
// use a custom rate limiter via its service ID
'login_throttling' => [
'limiter' => 'app.login_rate_limiter',
],
],
],
],
]);定制认证成功与失败行为
若要改变认证成功或失败时的处理方式,无须全局覆盖对应监听器。实现 AuthenticationSuccessHandlerInterface 或 AuthenticationFailureHandlerInterface,然后配置自定义处理器即可。
原文参考:AuthenticationSuccessHandlerInterface;AuthenticationFailureHandlerInterface。
更多细节参阅“自定义成功处理器”。
原文参考:how to customize your success handler。
通过代码登录
可以调用 Security 辅助服务的 login(),以编程方式登录用户:
原文参考:Security。
译者静态审查:这里连续展示的是 login() 的不同调用形式,不是要依次执行的登录流程。实际只选适用的一种。$user = ...、ExampleAuthenticator、其他防火墙和响应处理均须补齐;login() 返回值也可能为空,不能在所有场景都假定它满足 Response 返回类型。
// src/Controller/SecurityController.php
namespace App\Controller;

use App\Security\Authenticator\ExampleAuthenticator;
use Symfony\Bundle\SecurityBundle\Security;
use Symfony\Component\Security\Http\Authenticator\Passport\Badge\RememberMeBadge;

class SecurityController
{
    public function someAction(Security $security): Response
    {
        // get the user to be authenticated
        $user = ...;

        // log the user in on the current firewall
        $security->login($user);

        // if the firewall has more than one authenticator, you must pass it explicitly
        // by using the name of built-in authenticators...
        $security->login($user, 'form_login');
        // ...or the service id of custom authenticators
        $security->login($user, ExampleAuthenticator::class);

        // you can also log in on a different firewall...
        $security->login($user, 'form_login', 'other_firewall');

        // ... add badges...
        $security->login($user, 'form_login', 'other_firewall', [new RememberMeBadge()->enable()]);

        // ... and also add passport attributes
        $security->login($user, 'form_login', 'other_firewall', [new RememberMeBadge()->enable()], ['referer' => 'https://oauth.example.com']);

        // use the redirection logic applied to regular login
        $redirectResponse = $security->login($user);
        return $redirectResponse;

        // or use a custom redirection logic (e.g. redirect users to their account page)
        // return new RedirectResponse('...');
    }
}
退出登录
在防火墙下启用 logout 配置,即可支持退出登录:
# config/packages/security.yaml
security:
    # ...

    firewalls:
        main:
            # ...
            logout:
                path: /logout

                # where to redirect after logout
                # target: app_any_route
// config/packages/security.php
namespace Symfony\Component\DependencyInjection\Loader\Configurator;
return App::config([
'security' => [
'firewalls' => [
'main' => [
'logout' => [
'path' => '/logout',
// where to redirect after logout
// 'target' => 'app_any_route',
],
],
],
],
]);用户访问配置的退出路径时,Symfony 会撤销其认证状态,再重定向到配置的目标地址。
提示
如需引用退出路径,可以使用 _logout_<firewallname> 路由名,例如 _logout_main。
如果项目没有使用 Symfony Flex,需要确保路由中导入退出路由加载器:
原文参考:Symfony Flex。
# config/routes/security.yaml
_symfony_logout:
    resource: security.route_loader.logout
    type: service
// config/routes/security.php
namespace Symfony\Component\Routing\Loader\Configurator;
return Routes::config([
'_symfony_logout' => [
'resource' => 'security.route_loader.logout',
'type' => 'service',
],
]);通过代码退出登录
可以调用 Security 辅助服务的 logout(),以编程方式退出:
原文参考:Security。
译者静态审查:两次 logout() 是替代示例,实际不应顺序照抄。logout(false) 显式关闭 CSRF 校验,不能未经分析作为生产默认。还必须补齐 Response 导入和实际返回路径。
// src/Controller/SecurityController.php
namespace App\Controller;

use Symfony\Bundle\SecurityBundle\Security;

class SecurityController
{
    public function someAction(Security $security): Response
    {
        // logout the user on the current firewall
        $response = $security->logout();

        // you can also disable the CSRF protection
        $response = $security->logout(false);

        // ... return $response (if set) or e.g. redirect to the homepage
    }
}
用户会从当前请求所属的防火墙退出。如果请求不在任何防火墙范围内,会抛出 LogicException。
定制退出行为
有时退出时需要执行额外逻辑,例如使某些令牌失效,或定制退出后的行为。退出期间会分发 LogoutEvent,可以注册事件监听器或订阅器执行相应逻辑:
原文参考:LogoutEvent;event listener or subscriber。
// src/EventListener/LogoutSubscriber.php
namespace App\EventListener;

use Symfony\Component\EventDispatcher\EventSubscriberInterface;
use Symfony\Component\HttpFoundation\RedirectResponse;
use Symfony\Component\Routing\Generator\UrlGeneratorInterface;
use Symfony\Component\Security\Http\Event\LogoutEvent;

class LogoutSubscriber implements EventSubscriberInterface
{
    public function __construct(
        private UrlGeneratorInterface $urlGenerator
    ) {
    }

    public static function getSubscribedEvents(): array
    {
        return [LogoutEvent::class => 'onLogout'];
    }

    public function onLogout(LogoutEvent $event): void
    {
        // get the security token of the session that is about to be logged out
        $token = $event->getToken();

        // get the current request
        $request = $event->getRequest();

        // get the current response, if it is already set by another listener
        $response = $event->getResponse();

        // configure a custom logout response to the homepage
        $response = new RedirectResponse(
            $this->urlGenerator->generate('homepage'),
            RedirectResponse::HTTP_SEE_OTHER
        );
        $event->setResponse($response);
    }
}
定制退出路径
也可以把 path 配置为路由名。当退出 URI 需要动态变化时,例如随当前语言切换,这会很方便。此时必须自行创建该路由:
# config/routes.yaml
app_logout:
    path:
        en: /logout
        fr: /deconnexion
    methods: GET
// config/routes.php
namespace Symfony\Component\Routing\Loader\Configurator;
return Routes::config([
'app_logout' => [
'path' => [
'en' => '/logout',
'fr' => '/deconnexion',
],
'methods' => ['GET'],
],
]);随后,把路由名传给 path:
# config/packages/security.yaml
security:
    # ...

    firewalls:
        main:
            # ...
            logout:
path: app_logout译者静态审查:该 PHP 块存在原文配置错误:它使用路由加载器的 Routes::config,并把 firewalls 放在顶层,不能作为 config/packages/security.php 的等价安全配置。上方 YAML 已显示正确层级 security.firewalls.main.logout.path;如采用 PHP,应按前文 SecurityBundle 配置形式,用 DependencyInjection 配置命名空间的 App::config,包含 security 顶层键。此处原样保留错误代码,仅供来源对照。
// config/packages/security.php
namespace Symfony\Component\Routing\Loader\Configurator;

return [
    Routes::config([
        'firewalls' => [
            'main' => [
                'logout' => [
                    'path' => 'app_logout',
                ],
            ],
        ],
    ]),
];
取得用户对象
在控制器中取得用户
为控制器参数添加 #[CurrentUser],并用表示用户的类,通常是 User,作为类型提示,即可取得已认证用户。参数允许 null 时,也允许匿名访问;参数不允许 null 时,没有用户认证就会自动拒绝访问,Symfony 会抛出 403 错误。
原文参考:controller。
基类控制器的 getUser() 快捷方法也可使用,但更推荐 #[CurrentUser]:它不需要 @var 注释就能提供准确类型信息,适用于任意控制器而不局限于 AbstractController 子类,也能在方法签名中明确表达对当前用户的依赖。
译者静态审查:这个控制器片段缺少 IsGranted 与 Response 的 use 导入;前面生成的 User 也没有 getFirstName(),需自行实现或改用已有字段。不能将该片段当作完整可执行控制器。
// src/Controller/ProfileController.php
namespace App\Controller;

use App\Entity\User;
use Symfony\Bundle\FrameworkBundle\Controller\AbstractController;
use Symfony\Component\Security\Http\Attribute\CurrentUser;

class ProfileController
{
    // usually you'll want to make sure the user is authenticated first,
    // see "Authorization" below
    #[IsGranted('IS_AUTHENTICATED_FULLY')]
    public function index(#[CurrentUser] User $user): Response
    {
        // ... call here any methods you've added to your User class
        return new Response('Well hi there '.$user->getFirstName());
    }
}
// src/Controller/ProfileController.php
namespace App\Controller;
use Symfony\Bundle\FrameworkBundle\Controller\AbstractController;
class ProfileController extends AbstractController
{
public function index(): Response
{
// usually you'll want to make sure the user is authenticated first,
// see "Authorization" below
$this->denyAccessUnlessGranted('IS_AUTHENTICATED_FULLY');
/** @var \App\Entity\User $user */
$user = $this->getUser();
// ... call here any methods you've added to your User class
return new Response('Well hi there '.$user->getFirstName());
}
}提示
#[CurrentUser] 也可以应用于由多个用户类组成的联合类型:
#[CurrentUser] Admin|Customer|User $user在服务中取得用户
如果需要在服务中访问已登录用户,可以使用 Security 服务:
原文参考:Security。
// src/Service/ExampleService.php
// ...

use Symfony\Bundle\SecurityBundle\Security;

class ExampleService
{
    // avoid calling getUser() in the constructor: auth may not
    // be complete yet. Instead, inject the entire Security object.
    public function __construct(
        private Security $security,
    ){
    }

    public function someMethod(): void
    {
        // returns User object or null if not authenticated
        $user = $this->security->getUser();

        // ...
    }
}
在模板中取得用户
借助 Twig 的全局 app 变量,用户对象可以通过 app.user 访问:
原文参考:Twig global app variable。
{% if is_granted('IS_AUTHENTICATED_FULLY') %}
    <p>Email: {{ app.user.email }}</p>
{% endif %}
访问控制:授权
用户已经可以通过登录表单进入应用。接下来需要决定如何拒绝访问,以及如何使用 User 对象。这个过程叫作授权:它判断用户能否访问某项资源,例如 URL、模型对象或方法调用。
授权包括两个方面:
用户登录后拥有特定角色,例如 ROLE_ADMIN。
应用代码要求资源,例如 URL 或控制器,必须通过某个属性的授权检查才能访问;该属性可以是 ROLE_ADMIN 这样的角色。
角色
用户登录时,Symfony 调用 User 对象的 getRoles() 来确定角色。在前面生成的 User 类中,角色以数组形式保存到数据库,并保证每个用户至少拥有 ROLE_USER:
// src/Entity/User.php

// ...
class User implements UserInterface, PasswordAuthenticatedUserInterface
{
    /**
     * @var list<string> The user roles
     */
    #[ORM\Column]
    private array $roles = [];

    // ...
    public function getRoles(): array
    {
        $roles = $this->roles;
        // guarantee every user at least has ROLE_USER
        $roles[] = 'ROLE_USER';

        return array_unique($roles);
    }
}
这是一种合理的默认做法,也可以按自己的需求确定用户角色。唯一的命名规则是角色必须以 ROLE_ 开头,否则不会按预期工作。除此之外,角色只是字符串,可以按需命名,例如 ROLE_PRODUCT_ADMIN。
随后会用这些角色控制网站不同部分的访问权限。
角色层级
不必为每个用户逐个赋予大量角色,也可以定义角色层级,表达继承规则:
# config/packages/security.yaml
security:
    # ...

    role_hierarchy:
        ROLE_ADMIN:       ROLE_USER
        ROLE_SUPER_ADMIN: [ROLE_ADMIN, ROLE_ALLOWED_TO_SWITCH]
// config/packages/security.php
namespace Symfony\Component\DependencyInjection\Loader\Configurator;
return App::config([
'security' => [
'role_hierarchy' => [
'ROLE_ADMIN' => ['ROLE_USER'],
'ROLE_SUPER_ADMIN' => ['ROLE_ADMIN', 'ROLE_ALLOWED_TO_SWITCH'],
],
],
]);拥有 ROLE_ADMIN 的用户也拥有 ROLE_USER。拥有 ROLE_SUPER_ADMIN 的用户则自动拥有 ROLE_ADMIN、ROLE_ALLOWED_TO_SWITCH,以及从 ROLE_ADMIN 继承的 ROLE_USER。
警告
要正确使用角色层级,不应手动调用 $user->getRoles() 来作授权判断。例如,在继承基类控制器的代码中应这样处理:
原文参考:base controller。
// BAD - $user->getRoles() will not know about the role hierarchy
$hasAccess = in_array('ROLE_ADMIN', $user->getRoles());

// GOOD - use of the normal security methods
$hasAccess = $this->isGranted('ROLE_ADMIN');
$this->denyAccessUnlessGranted('ROLE_ADMIN');
注意
role_hierarchy 的配置值是静态的,不能直接把角色层级放进数据库。如果需要动态层级,应实现一个自定义安全 voter,从数据库查找相关角色。
原文参考:security voter。
提示
为便于调试,可以把角色层级生成为 SVG 或 PNG 图。先安装免费开源的 Mermaid CLI,以取得 mmdc 命令,然后运行:
原文参考:Mermaid CLI。
$ php bin/console debug:security:role-hierarchy | mmdc -o roles.svg随后打开 roles.svg,就能查看生成的关系图。
通过代码访问角色层级
可以注入 RoleHierarchyInterface 服务,以编程方式访问角色层级。当需要为一组角色获取全部可达的子角色或父角色时,这很有用:
原文参考:RoleHierarchyInterface。
use Symfony\Component\Security\Core\Role\RoleHierarchyInterface;

class RoleService
{
    public function __construct(
        private RoleHierarchyInterface $roleHierarchy,
    ) {
    }

    public function getAccessibleRoles(array $roles): array
    {
        // get all child roles (roles that are inherited by the given roles)
        // e.g., ['ROLE_ADMIN'] returns ['ROLE_ADMIN', 'ROLE_USER']
        return $this->roleHierarchy->getReachableRoleNames($roles);
    }

    public function getParentRoles(array $roles): array
    {
        // get all parent roles (roles that inherit the given roles)
        // e.g., ['ROLE_USER'] returns ['ROLE_USER', 'ROLE_ADMIN', 'ROLE_SUPER_ADMIN']
        return $this->roleHierarchy->getParentRoleNames($roles);
    }
}
Symfony 8.1
getParentRoleNames() 方法在 Symfony 8.1 中引入。
在代码中拒绝访问
有两种方式可以保护资源:
在 security.yaml 中使用 access_control 保护 URL 模式,例如 /admin/*。这种方式简单,但灵活性较低。
在控制器或其他代码中执行授权检查。
保护 URL 模式:access_control
最基本的做法是在 security.yaml 中保护整个 URL 范围。例如,要求所有以 /admin 开头的 URL 都具备 ROLE_ADMIN:
译者静态审查:连续两条 ^/admin 是两种替代规则,第一条匹配后第二条不会执行。多个属性的最终授权语义还取决于访问决策策略,不应把数组无条件理解为所有角色必须同时具备。
# config/packages/security.yaml
security:
    # ...

    firewalls:
        # ...
        main:
            # ...

    access_control:
        # require ROLE_ADMIN for /admin*
        - { path: '^/admin', roles: ROLE_ADMIN }

        # or require ROLE_ADMIN or IS_AUTHENTICATED_FULLY for /admin*
        - { path: '^/admin', roles: [IS_AUTHENTICATED_FULLY, ROLE_ADMIN] }

        # the 'path' value can be any valid regular expression
        # (this one will match URLs like /api/post/7298 and /api/comment/528491)
        - { path: ^/api/(post|comment)/\d+$, roles: ROLE_USER }
// config/packages/security.php
namespace Symfony\Component\DependencyInjection\Loader\Configurator;
return App::config([
'security' => [
'firewalls' => [
'main' => [
// ...
],
],
'access_control' => [
// require ROLE_ADMIN for /admin*
['path' => '^/admin', 'roles' => 'ROLE_ADMIN'],
// or require ROLE_ADMIN or IS_AUTHENTICATED_FULLY for /admin*
['path' => '^/admin', 'roles' => ['IS_AUTHENTICATED_FULLY', 'ROLE_ADMIN']],
// the 'path' value can be any valid regular expression
// (this one will match URLs like /api/post/7298 and /api/comment/528491)
['path' => '^/api/(post|comment)/\d+$', 'roles' => 'ROLE_USER'],
],
],
]);可以定义任意数量的 URL 正则模式,但每次请求只采用一条规则。Symfony 从上往下检查,遇到第一个匹配就停止:
# config/packages/security.yaml
security:
    # ...

    access_control:
        # matches /admin/users/*
        - { path: '^/admin/users', roles: ROLE_SUPER_ADMIN }

        # matches /admin/* except for anything matching the above rule
        - { path: '^/admin', roles: ROLE_ADMIN }
// config/packages/security.php
namespace Symfony\Component\DependencyInjection\Loader\Configurator;
return App::config([
'security' => [
// ...
'access_control' => [
// matches /admin/users/*
['path' => '^/admin/users', 'roles' => 'ROLE_SUPER_ADMIN'],
// matches /admin/* except for anything matching the above rule
['path' => '^/admin', 'roles' => 'ROLE_ADMIN'],
],
],
]);路径模式以 ^ 开头,表示只匹配以该模式起始的 URL。没有 ^ 的 /admin 不仅匹配 /admin/foo,也会匹配 /foo/admin。
每条 access_control 还可以按 IP、主机名和 HTTP 方法匹配,也可以把匹配 URL 重定向到 HTTPS。更复杂的场景可以使用实现 RequestMatcherInterface 的服务。
详情参阅“Security 的 access_control 如何工作”。
原文参考:How Does the Security access_control Work?。
保护控制器及其他代码
可以在控制器内部拒绝访问:
// src/Controller/AdminController.php
// ...

public function adminDashboard(): Response
{
    $this->denyAccessUnlessGranted('ROLE_ADMIN');

    // or add an optional message - seen by developers
    $this->denyAccessUnlessGranted('ROLE_ADMIN', null, 'User tried to access a page without having ROLE_ADMIN');
}
如果不允许访问,就会抛出 AccessDeniedException,控制器之后的代码不再执行。随后发生以下两种情况之一:
原文参考:AccessDeniedException。
用户尚未登录时,会被要求登录,例如重定向到登录页面。
用户已经登录、但没有 ROLE_ADMIN 时,显示 403 拒绝访问页面;该页面可以定制。
原文参考:customize。
也可以通过 #[IsGranted] 保护一个或多个控制器动作。下面的例子中,所有动作都要求 ROLE_ADMIN,只有 adminDashboard() 改为要求 ROLE_SUPER_ADMIN:
// src/Controller/AdminController.php
// ...

use Symfony\Component\Security\Http\Attribute\IsGranted;

#[IsGranted('ROLE_ADMIN')]
class AdminController extends AbstractController
{
    // Optionally, you can set a custom message that will be displayed to the user
    #[IsGranted('ROLE_SUPER_ADMIN', message: 'You are not allowed to access the admin dashboard.')]
    public function adminDashboard(): Response
    {
        // ...
    }
}
可以通过参数名称引用控制器参数,并把它作为 voter 的 subject。Symfony 会从控制器方法签名自动解析:
// src/Controller/PostController.php
// ...

use App\Entity\Post;
use Symfony\Component\Security\Http\Attribute\IsGranted;

class PostController extends AbstractController
{
    #[Route('/posts/{id}/edit', name: 'post_edit')]
    // 'post' refers to the $post parameter of the controller method
    #[IsGranted('edit', 'post')]
    public function edit(Post $post): Response
    {
        // ...
    }
}
若要使用不同于默认 403 的状态码,可以设置 statusCode 参数:
// src/Controller/AdminController.php
// ...

use Symfony\Component\Security\Http\Attribute\IsGranted;

#[IsGranted('ROLE_ADMIN', statusCode: 423)]
class AdminController extends AbstractController
{
    // ...
}
也可以通过 exceptionCode 设置所抛出 AccessDeniedException 的内部异常码:
原文参考:AccessDeniedException。
// src/Controller/AdminController.php
// ...

use Symfony\Component\Security\Http\Attribute\IsGranted;

#[IsGranted('ROLE_ADMIN', statusCode: 403, exceptionCode: 10010)]
class AdminController extends AbstractController
{
    // ...
}
还可以扩展 IsGranted 属性,创建语义更明确的快捷属性:
译者静态审查:如果将 IsAdmin 真正用作 PHP 属性,应按 PHP 规则在这个具体类上声明 #[\Attribute],并选择需要的目标和可重复标志;继承 IsGranted 本身不等于完成属性类声明。原例省略了该标记,代码保持原样供对照。
// src/Security/Attribute/IsAdmin.php
// ...

use Symfony\Component\Security\Http\Attribute\IsGranted;

class IsAdmin extends IsGranted
{
    public function __construct()
    {
        return parent::__construct('ROLE_ADMIN');
    }
}
通过 methods 参数,可以把访问验证限制在指定 HTTP 方法:
// src/Controller/AdminController.php
// ...

use Symfony\Component\Security\Http\Attribute\IsGranted;

#[IsGranted('ROLE_ADMIN', methods: 'POST')]
class AdminController extends AbstractController
{
    // You can also specify an array of methods
    #[IsGranted('ROLE_SUPER_ADMIN', methods: ['GET', 'PUT'])]
    public function adminDashboard(): Response
    {
        // ...
    }
}
模板中的访问控制
在任意 Twig 模板中,都可以通过内置 is_granted() 检查当前用户是否拥有某个角色:
{% if is_granted('ROLE_ADMIN') %}
    <a href="...">Delete</a>
{% endif %}
类似地,is_granted_for_user() 用来检查指定用户是否拥有某个角色:
{% if is_granted_for_user(user, 'ROLE_ADMIN') %}
    <a href="...">Delete</a>
{% endif %}
Symfony 还提供 access_decision() 和 access_decision_for_user(),既能检查授权,也能取回自定义 voter 给出的拒绝原因:
原文参考:your custom security voters。
{% set voter_decision = access_decision('post_edit', post) %}
{% if voter_decision.isGranted %}
    {# ... #}
{% else %}
    {# before showing voter messages to end users, make sure it's safe to do so #}
    <p>{{ voter_decision.message }}</p>
{% endif %}

{% set voter_decision = access_decision_for_user(anotherUser, 'post_edit', post) %}
{% if voter_decision.isGranted %}
    {# ... #}
{% else %}
    <p>The {{ anotherUser.name }} user doesn't have sufficient permission:</p>
    {# before showing voter messages to end users, make sure it's safe to do so #}
    <p>{{ voter_decision.message }}</p>
{% endif %}
保护其他服务
注入 Security 服务后,可以在代码的任何地方检查访问权限。例如,SalesReportManager 只为拥有 ROLE_SALES_ADMIN 的用户附加更详细的报表信息:
// src/SalesReport/SalesReportManager.php

  // ...
  use Symfony\Component\Security\Core\Exception\AccessDeniedException;
+ use Symfony\Bundle\SecurityBundle\Security;

  class SalesReportManager
  {
+     public function __construct(
+         private Security $security,
+     ) {
+     }

      public function generateReport(): void
      {
          $salesData = [];

+         if ($this->security->isGranted('ROLE_SALES_ADMIN')) {
+             $salesData['top_secret_numbers'] = rand();
+         }

          // ...
      }

      // ...
  }
提示
isGranted() 检查当前已登录用户的权限。如需检查另一位用户,或者没有可用的用户会话,例如在消息队列或定时任务等 CLI 环境中,可以调用 isGrantedForUser() 显式指定目标用户。
还可以使用 getAccessDecision() 和 getAccessDecisionForUser() 检查权限,并取得自定义 voter 提供的拒绝原因:
原文参考:your custom security voters。
// src/SalesReport/SalesReportManager.php

// ...
use Symfony\Bundle\SecurityBundle\Security;

class SalesReportManager
{
    public function __construct(
        private Security $security,
    ) {
    }

    public function generateReport(): void
    {
        $voterDecision = $this->security->getAccessDecision('ROLE_SALES_ADMIN');
        if ($voterDecision->isGranted) {
            // ...
        } else {
            // do something with $voterDecision->getMessage()
        }

        // ...
    }

    // ...
}
如果使用默认 services.yaml,Symfony 会根据 Security 类型提示,通过自动装配将 security.helper 注入服务。
原文参考:default services.yaml configuration。
也可以使用更底层的 AuthorizationCheckerInterface。它提供与 Security 对应的授权检查能力,并允许使用更具体的接口类型提示。
原文参考:AuthorizationCheckerInterface。
允许未认证访问:匿名用户
访问者尚未登录时,被视为未认证用户,不拥有任何角色。如果定义了要求角色的 access_control 规则,这会阻止其访问。
在 access_control 中使用 PUBLIC_ACCESS,可以让特定路由允许未认证访问,例如登录页面:
# config/packages/security.yaml
security:

    # ...
    access_control:
        # allow unauthenticated users to access the login form
        - { path: ^/admin/login, roles: PUBLIC_ACCESS }

        # but require authentication for all other admin routes
        - { path: ^/admin, roles: ROLE_ADMIN }
// config/packages/security.php
namespace Symfony\Component\DependencyInjection\Loader\Configurator;
return App::config([
'security' => [
// ...
'access_control' => [
// allow unauthenticated users to access the login form
['path' => '^/admin/login', 'roles' => 'PUBLIC_ACCESS'],
// but require authentication for all other admin routes
['path' => '^/admin', 'roles' => 'ROLE_ADMIN'],
],
],
]);在自定义 voter 中允许匿名访问
使用自定义 voter 时,可以检查 token 是否没有用户对象,以决定是否允许匿名访问:
原文参考:custom voter。
译者静态审查:原文导入了不存在于标准 Security Core 路径的 Symfony\Component\Security\Core\Authentication\User\UserInterface。应改为 Symfony\Component\Security\Core\User\UserInterface,否则 instanceof 的判定不对应实际用户接口,可能错误进入匿名分支。该片段还省略已登录用户的布尔返回逻辑,必须补齐;不要直接用于权限判断。
// src/Security/PostVoter.php
namespace App\Security;

// ...
use Symfony\Component\Security\Core\Authentication\Token\TokenInterface;
use Symfony\Component\Security\Core\Authentication\User\UserInterface;
use Symfony\Component\Security\Core\Authorization\Voter\Vote;
use Symfony\Component\Security\Core\Authorization\Voter\Voter;

class PostVoter extends Voter
{
    // ...

    protected function voteOnAttribute(string $attribute, $subject, TokenInterface $token, ?Vote $vote = null): bool
    {
        // ...

        if (!$token->getUser() instanceof UserInterface) {
            // the user is not authenticated, e.g. only allow them to
            // see public posts
            return $subject->isPublic();
        }
    }
}
为用户设置细粒度权限
大多数应用需要更细的访问规则,例如博客用户只能修改自己的评论。voter 允许编写任意必要的业务逻辑来判断权限,使用方式与前面的角色检查类似。实现方法见“如何使用 voter 检查用户权限”。
原文参考:How to Use Voters to Check User Permissions。
检查用户是否已经登录
如果只需要知道用户是否登录,而不关心具体角色,有两种选择。
第一,如果给所有用户赋予了 ROLE_USER,就可以检查这个角色。
第二,可以用特殊属性 IS_AUTHENTICATED 代替角色进行检查:
// ...

public function adminDashboard(): Response
{
    $this->denyAccessUnlessGranted('IS_AUTHENTICATED');

    // ...
}
凡是能使用角色的位置,例如 access_control 和 Twig,都可以使用 IS_AUTHENTICATED。
IS_AUTHENTICATED 本身不是角色,但使用方式类似,已登录用户都会满足这一属性。还有一些相关的特殊属性:
IS_AUTHENTICATED_FULLY:比 IS_AUTHENTICATED_REMEMBERED 更严格。仅凭“记住我”Cookie 恢复身份的用户满足 IS_AUTHENTICATED_REMEMBERED,但不满足 IS_AUTHENTICATED_FULLY。
IS_REMEMBERED:只匹配通过“记住我”功能,即 remember-me Cookie 认证的用户。
原文参考:remember me functionality。
IS_IMPERSONATOR:当前用户正在此会话中模拟另一位用户时匹配。
原文参考:impersonating。
理解用户如何从会话刷新
除 stateless 防火墙外,每次请求结束时,User 对象都会被序列化到会话。下一次请求开始时,它会被反序列化,再交给用户提供器刷新,例如由 Doctrine 重新查询用户。
随后比较会话中的原用户对象与刷新后的用户对象。默认情况下,核心 AbstractToken 会比较 getPassword()、getSalt() 和 getUserIdentifier() 的返回值。任一发生变化,都将退出用户。这项安全措施确保核心用户数据改变时,可以撤销可能被滥用的认证状态。
把明文密码或密码哈希保存在会话中可能带来风险。可以在用户类实现 __serialize(),在序列化前排除或转换密码字段。
支持两种策略:
完全移除密码。反序列化后,getPassword() 返回 null,Symfony 刷新用户时不再比较密码。原文只将它作为存储明文密码时的处理方案,并明确不推荐存储明文密码;译者同样不建议采用这种密码存储设计。
对密码字段使用 crc32c 算法计算摘要。Symfony 会对刷新后用户的密码字段做相同处理,再与会话值比较。这避免了把真实密码哈希放入会话,同时仍可在密码变化时使会话失效。这里的 crc32c 用于会话比较,不是用来替代安全密码哈希器。
假设密码保存在名为 password 的私有属性中,示例如下:
public function __serialize(): array
{
    $data = (array) $this;
    $data["\0".self::class."\0password"] = hash('crc32c', $this->password);

    return $data;
}
如果认证行为异常,也可能是登录已经成功,但第一次重定向后立刻丢失了认证状态。
遇到这种情况,应检查用户类的序列化逻辑,例如 __serialize() 或 serialize(),确保必要字段被序列化,同时排除 Doctrine 关联等不必要字段。
通过 EquatableInterface 自行比较用户
如果需要更充分地控制比较过程,让 User 类实现 EquatableInterface 即可。此时会调用自定义 isEqualTo(),替代核心默认比较逻辑。
原文参考:EquatableInterface。
安全事件
认证过程中会分发多个事件,可以通过事件监听器或订阅器介入流程,或定制返回给用户的响应。
原文参考:event listener or subscriber。
提示
每个安全防火墙都有自己的事件分发器,名称为 security.event_dispatcher.FIREWALLNAME。事件同时发送到全局分发器和对应防火墙分发器。若希望监听器只响应某个防火墙,应注册到对应分发器。例如,同时存在 api 和 main 时,下面只监听 main 的退出事件:
# config/services.yaml
services:
    # ...

    App\EventListener\LogoutSubscriber:
        tags:
            - name: kernel.event_subscriber
              dispatcher: security.event_dispatcher.main
// config/services.php
namespace Symfony\Component\DependencyInjection\Loader\Configurator;
use App\EventListener\LogoutSubscriber;
return [
'services' => [
LogoutSubscriber::class => [
'tags' => [
['kernel.event_subscriber' => ['dispatcher' => 'security.event_dispatcher.main']],
],
],
],
]);认证事件
CheckPassportEvent
原文参考:CheckPassportEvent。
认证器创建安全 passport 后分发。监听器执行实际认证检查,例如检查 passport、校验 CSRF 令牌等。
原文参考:security passport。
AuthenticationTokenCreatedEvent
原文参考:AuthenticationTokenCreatedEvent。
passport 验证通过,且认证器创建安全 token 与用户之后分发。适合需要修改新 token 的高级场景,例如多因素认证。
AuthenticationSuccessEvent
原文参考:AuthenticationSuccessEvent。
认证即将成功时分发。这是最后一个仍可通过抛出 AuthenticationException 使认证失败的事件。
LoginSuccessEvent
原文参考:LoginSuccessEvent。
认证完全成功之后分发。监听器可以修改发给用户的响应。
LoginFailureEvent
原文参考:LoginFailureEvent。
认证过程中抛出 AuthenticationException 后分发。监听器可以修改错误响应。
其他事件
InteractiveLoginEvent
原文参考:InteractiveLoginEvent。
只有认证器实现 InteractiveAuthenticatorInterface 时,才会在认证完全成功后分发。该接口表示登录需要用户显式操作,例如填写登录表单。监听器可以修改响应。
原文参考:InteractiveAuthenticatorInterface。
LogoutEvent
原文参考:LogoutEvent。
用户即将退出应用时分发,参见前面的退出登录章节。
TokenDeauthenticatedEvent
原文参考:TokenDeauthenticatedEvent。
用户认证被撤销时分发,例如密码发生变化,参见会话刷新章节。
SwitchUserEvent
原文参考:SwitchUserEvent。
用户模拟完成后分发,参见“如何模拟用户”。
原文参考:How to Impersonate a User。
常见问题
可以使用多个防火墙吗?
可以。但每个防火墙都像独立的安全系统:在一个防火墙中完成认证,不代表也在另一个防火墙中认证。每个防火墙都可以提供多种认证方式,例如表单与 API 密钥。要在不同防火墙之间共享认证,需要显式配置相同的安全 context,具体条件见配置参考。
原文参考:Security Configuration Reference (SecurityBundle)。
为什么错误页面上的安全功能似乎不起作用?
路由处理早于安全处理,因此 404 错误页面不在任何防火墙的保护范围内,也无法在这些页面进行安全检查或读取用户对象。详情见“如何自定义错误页面”。
原文参考:How to Customize Error Pages。
认证没有报错,为什么始终不能保持登录?
有时认证本身已经成功,但从会话加载 User 出现问题,重定向后立刻退出。可以检查 var/log/dev.log 中是否出现下面的日志消息。
Cannot refresh token because user has changed
这条消息可能有两种原因。第一,用户对象从会话加载时出了问题,参见会话刷新章节;第二,上一次页面刷新后数据库中的某些用户信息改变,Symfony 出于安全考虑主动使用户退出。
继续阅读
认证:识别用户与登录
密码哈希与验证。
原文参考:Password Hashing and Verification。
LDAP。
原文参考:LDAP。
如何添加“记住我”登录功能。
原文参考:How to Add “Remember Me” Login Functionality。
如何模拟用户。
原文参考:How to Impersonate a User。
如何创建并启用自定义用户检查器。
原文参考:How to Create and Enable Custom User Checkers。
如何将防火墙限制到指定请求。
原文参考:How to Restrict Firewalls to a Request。
如何实现 CSRF 防护。
原文参考:How to Implement CSRF Protection。
定制表单登录认证器的响应。
原文参考:Customizing the Form Login Authenticator Responses。
如何编写自定义认证器。
原文参考:How to Write a Custom Authenticator。
认证入口点:帮助用户开始认证。
原文参考:The Entry Point: Helping Users Start Authentication。
授权:拒绝访问
如何使用 voter 检查用户权限。
原文参考:How to Use Voters to Check User Permissions。
Security 的 access_control 如何工作。
原文参考:How Does the Security access_control Work?。
在安全访问控制中使用表达式。
原文参考:Using Expressions in Security Access Controls。
如何定制拒绝访问响应。
原文参考:How to Customize Access Denied Responses。
如何对不同 URL 强制 HTTPS 或 HTTP。
原文参考:How to Force HTTPS or HTTP for Different URLs。
译者核验与使用边界
源页面 Edit 链接指向 Symfony 文档 8.1,__serialize、密码标准输入及 getParentRoleNames 等说明具有版本依赖。PHP 8.4+、MakerBundle、Doctrine/数据库与 SecurityBundle 为研究页明确边界;文中 App::config 等 API 不应不加核对地搬到旧 Symfony 项目。
防火墙与 access_control 都遵循首个匹配规则。无 pattern 的 main 应放在最后;处于防火墙下不代表必须登录。PUBLIC_ACCESS 例外必须排在更宽的限制规则前,且不要无意放开敏感路径。
表单示例必须继续完成 CSRF 章节;原文 secured_area 与前文 main 名称不一致,应按实际防火墙统一。error 只展示 messageKey/messageData,不能输出可能泄露敏感信息的 error.message。调试 profiler 仅限开发环境。
已定位原文缺陷:标准输入示例 echo \$PASSWORD 在常见 POSIX shell 传入字面值;退出 PHP 配置误用 Routes::config 且缺 security 层级;匿名 voter 的 UserInterface 命名空间错误;自定义 PHP 属性示例缺具体类的 Attribute 标记;控制器片段缺导入与用户字段。均紧邻原代码说明,没有暗中修订代码。
login_throttling 示例重复同名键,表示三种替代方案而非可同时粘贴的配置。多实例部署应使用一致的共享限流存储与可信客户端 IP;应用级限流不等于网络层抗拒绝服务保障。
登录/退出方法片段并列展示替代调用,不能全部顺序执行;logout(false) 会关闭 CSRF。GET 退出路由是否合适以及对应令牌传递,需要结合实际退出防护配置核对。
JSON 登录示例的 $token = ... 是占位,未实现令牌签发、寿命、撤销和校验。HTTP Basic 应通过 TLS 传输,浏览器继续发送凭据使普通会话退出无法清除认证。
X.509 依赖 Web 服务器真正验证证书,再把可信 DN 传给 PHP;optional/verify_if_given 允许无证书请求到达,因此受保护资源仍须授权规则。REMOTE_USER 与证书环境变量不可接受客户端伪造,应在可信代理和应用服务器边界中处理。服务器配置需按实际 Nginx/Apache/Caddy 版本适配。
角色层级应通过 isGranted/授权检查器评估,不可只读取 getRoles。隐藏模板链接只是展示控制,后端操作仍须独立授权。类与方法级属性可能同时参与检查;示例中的角色层级确保超级管理员也具备普通管理员角色。
会话中的 crc32c 是对已存储密码字段做变化比较,不是密码存储算法。用户数据库仍须使用安全密码哈希器。保留密码比较能在密码变化时撤销旧会话,不能为了保持登录而盲目移除。
composer require、Maker 命令、数据库迁移会修改项目、依赖或数据库;角色图命令会写入 roles.svg。本文只作静态审核,未安装依赖、执行 PHP、运行迁移或测试任何登录/权限流程。
来源、署名与授权
本文译自 Symfony 文档贡献者(原页结构化署名 Symfony) 的 Security。原页明确声明正文及代码示例采用 Creative Commons BY-SA 3.0,许可证:https://creativecommons.org/licenses/by-sa/3.0/ 。本译稿属于翻译改编,保留原作署名、来源与修改说明,并按 CC BY-SA 3.0 提供;原创说明与图文编排不改变原作署名。 译者补充与原文内容已作区分。
补充核验来源
Symfony 8.1 官方版本要求:Requires PHP 8.4.0 or higher
Symfony 8.1 UserInterface 源文件:namespace Symfony\Component\Security\Core\User
PHP 官方属性类声明说明:属性类须以 Attribute 声明;目标与可重复性另行指定。
原文与译稿 CC BY-SA 3.0 许可:源页声明包含代码样例,译文保留署名、标明改编并采用相同许可。










暂无评论内容