


构建采用自适应布局的应用
1. 简介
上一节练习中,你通过窗口尺寸类别和动态导航,开始把 Reply 应用改造成自适应应用。这些特性是面向各种屏幕尺寸开发应用的重要基础和第一步。如果尚未完成“使用动态导航构建自适应应用”练习,建议先从那里开始。
本练习将在已有概念上继续实现自适应布局。所采用的布局属于规范布局,即大屏幕上常用的一组布局模式。你还将学习更多工具与测试技巧,更快构建稳健的应用。
前提条件
• 完成“使用动态导航构建自适应应用”练习。
• 熟悉 Kotlin 编程,包括类、函数与条件语句。
• 熟悉 ViewModel 类。
• 熟悉 Composable 函数。
• 有使用 Jetpack Compose 构建布局的经验。
• 有在设备或模拟器上运行应用的经验。
• 有使用 WindowSizeClass API 的经验。
学习内容
• 使用 Jetpack Compose 创建列表—详情模式的自适应布局。
• 为不同屏幕尺寸创建预览。
• 针对多种屏幕尺寸测试代码。
构建目标
继续更新 Reply 应用,使其适应所有屏幕尺寸。
完成后的应用将采用后文展示的布局。
所需资源
• 能联网、装有浏览器与 Android Studio 的计算机。
• 能访问 GitHub。
下载起始代码
首先下载起始代码:
也可以克隆 GitHub 仓库:
$ git clone
https://github.com/google-developer-training/basic-android-kotlin-compose-training-reply-app.git
$ cd basic-android-kotlin-compose-training-reply-app
$ git checkout nav-update
> 起始代码位于下载仓库的 nav-update 分支。
可以在 Reply GitHub 仓库 浏览代码。
2. 为不同屏幕尺寸创建预览
创建不同尺寸的预览
上一节练习介绍了使用预览可组合项辅助开发。对于自适应应用,最佳实践是创建多个预览,分别展示不同屏幕尺寸。这样可以同时观察修改在各尺寸下的效果。预览也能作为文档,让代码审阅者知道应用支持哪些屏幕尺寸。
此前只有紧凑屏幕预览,接下来添加更多预览。
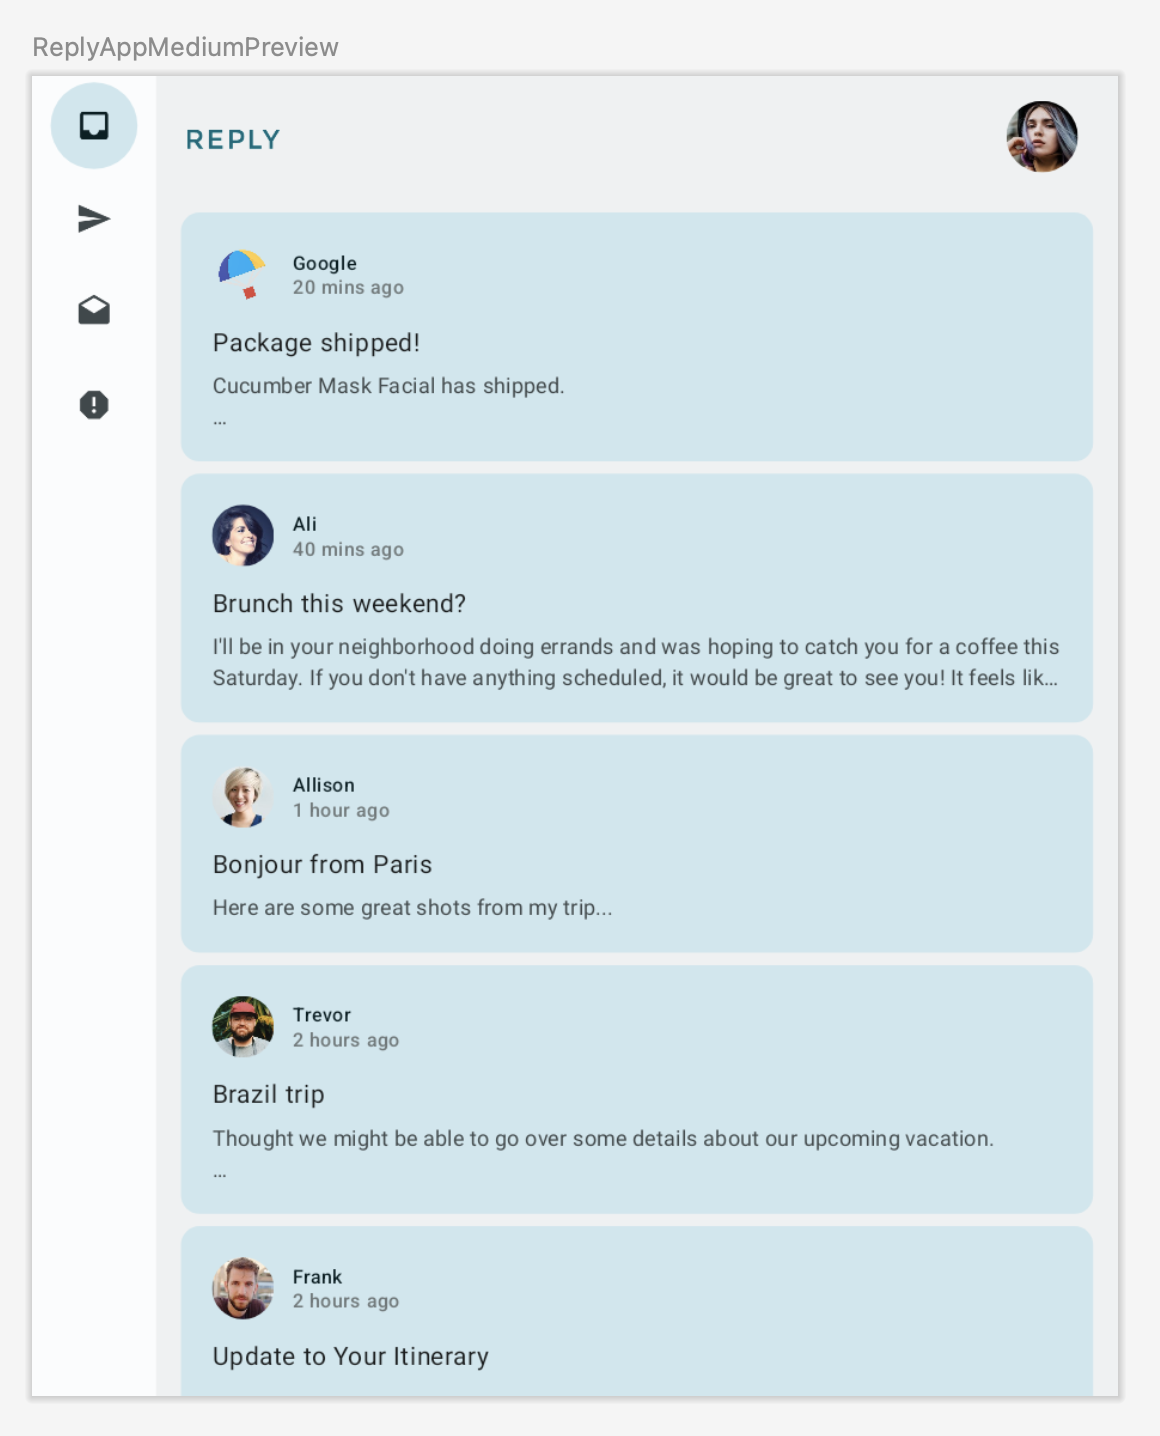
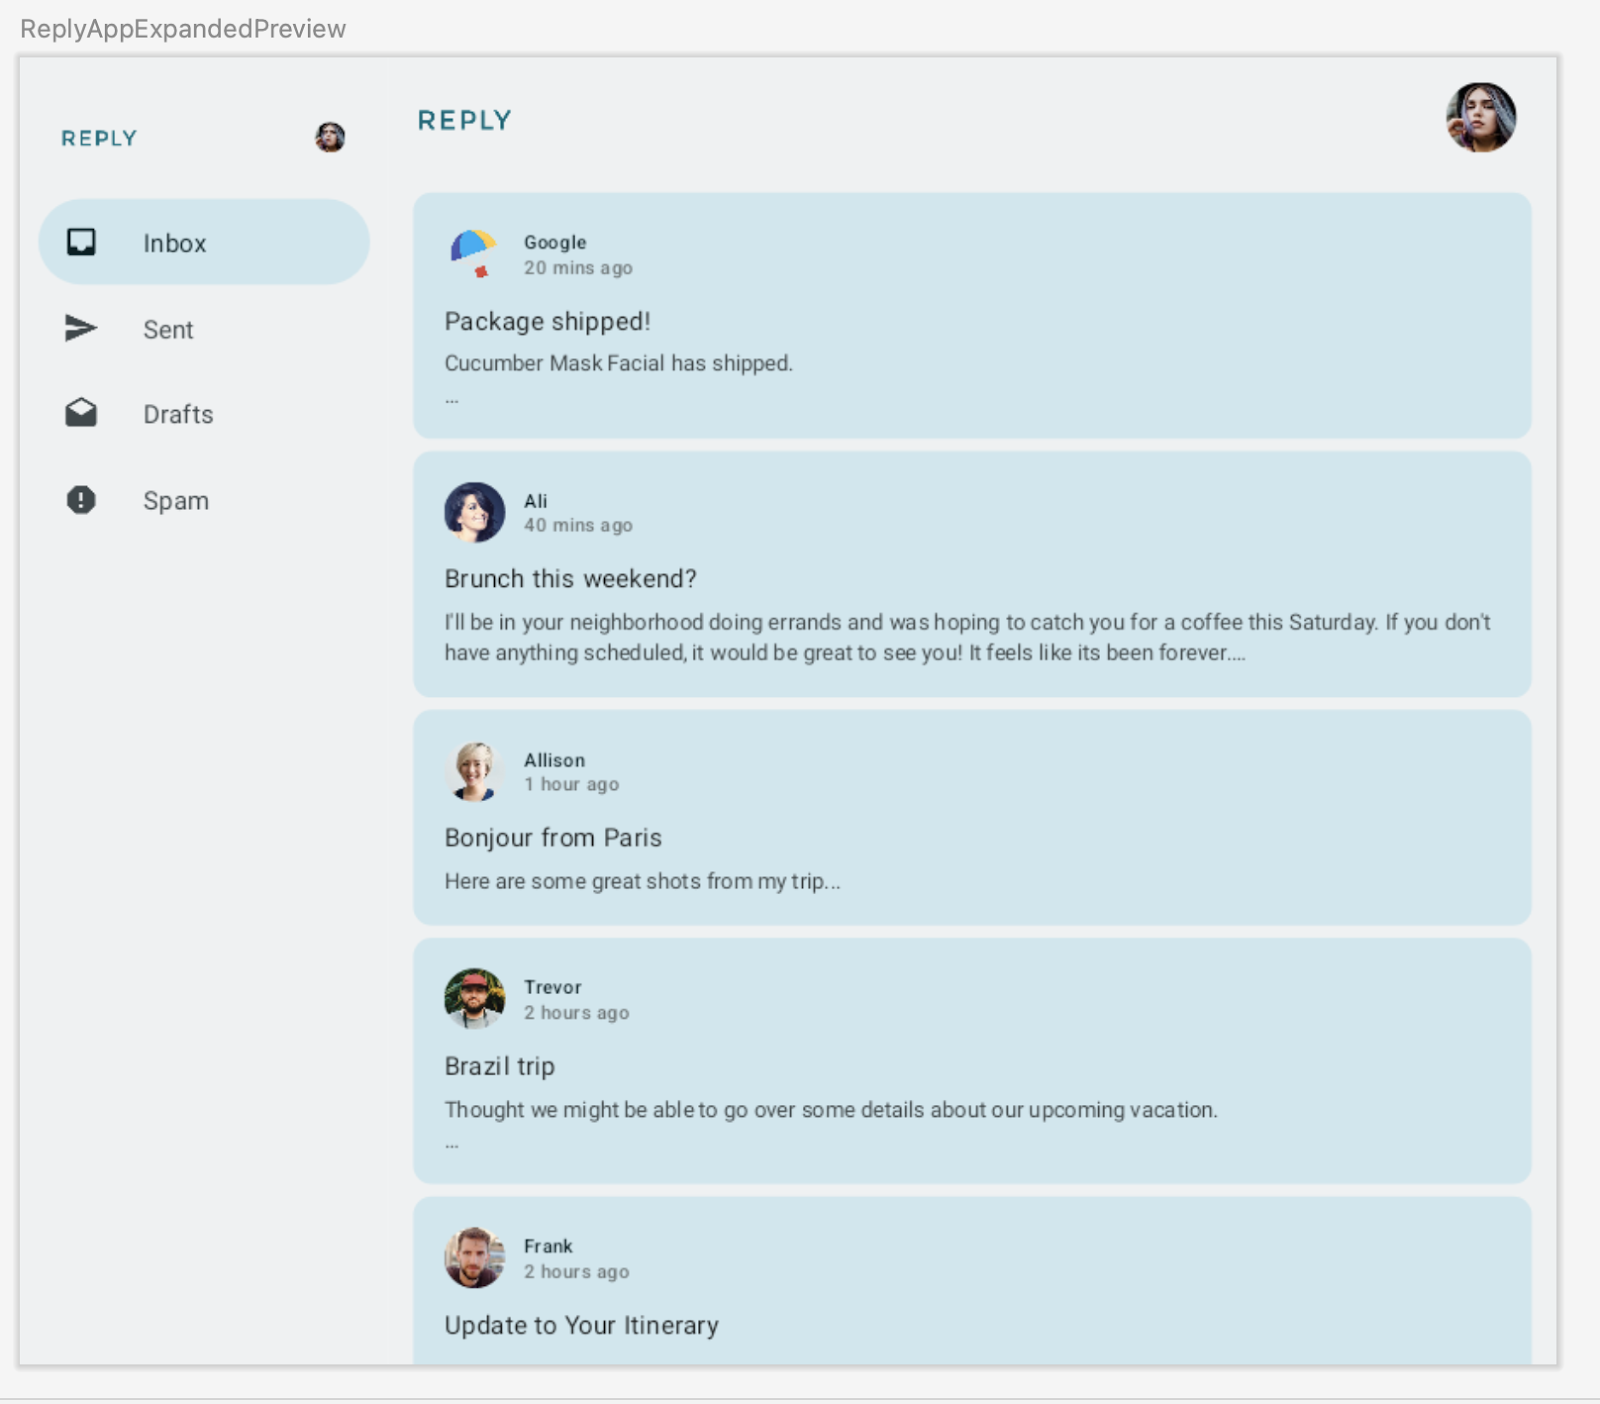
为中等和扩展屏幕添加预览:
• 在 Preview 注解中设置适中的 widthDp,并向 ReplyApp 可组合项传入 WindowWidthSizeClass.Medium,创建中等屏幕预览。
MainActivity.kt
...
@Preview(showBackground = true, widthDp = 700)
@Composable
fun ReplyAppMediumPreview() {
    ReplyTheme {
        Surface {
            ReplyApp(windowSize = WindowWidthSizeClass.Medium)
        }
    }
}
...
• 再设置更大的 widthDp,并传入 WindowWidthSizeClass.Expanded,创建扩展屏幕预览。
MainActivity.kt
...
@Preview(showBackground = true, widthDp = 1000)
@Composable
fun ReplyAppExpandedPreview() {
    ReplyTheme {
        Surface {
            ReplyApp(windowSize = WindowWidthSizeClass.Expanded)
        }
    }
}
...
• 构建预览,查看以下结果:
3. 实现自适应内容布局
列表—详情视图简介
你可能已经注意到,扩展屏幕中的内容被拉宽,没有充分利用可用空间。
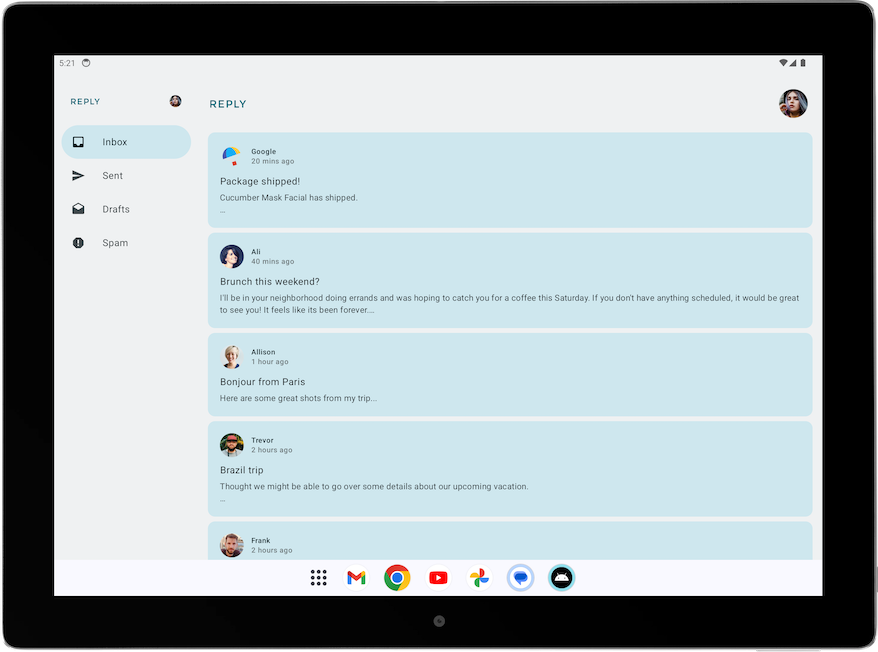
采用规范布局可以改善这一点。规范布局是大屏幕设计与实现的起点,有列表—详情、辅助面板和信息流三种,可指导应用中常见元素的组织。每种布局都考虑常见使用场景和组件,帮助应用在不同屏幕尺寸与断点间适应用户的预期和需求。
Reply 适合使用列表—详情视图,以便浏览内容并快速查看详情。我们将在邮件列表旁增加详情面板,用可用空间展示更多信息,提高应用的实用性。
实现列表—详情视图
为扩展屏幕实现列表—详情视图:
• 在 WindowStateUtils.kt 创建枚举类,表示不同内容布局。扩展屏幕使用 LIST_AND_DETAIL,其他情况使用 LIST_ONLY。
WindowStateUtils.kt
...
enum class ReplyContentType {
    LIST_ONLY, LIST_AND_DETAIL
}
...
• 在 ReplyApp.kt 声明 contentType,根据窗口尺寸赋予合适的内容类型。
ReplyApp.kt
...
import com.example.reply.ui.utils.ReplyContentType
...

    val navigationType: ReplyNavigationType
    val contentType: ReplyContentType

    when (windowSize) {
        WindowWidthSizeClass.Compact -> {
            ...
            contentType = ReplyContentType.LIST_ONLY
        }
        WindowWidthSizeClass.Medium -> {
            ...
            contentType = ReplyContentType.LIST_ONLY
        }
        WindowWidthSizeClass.Expanded -> {
            ...
            contentType = ReplyContentType.LIST_AND_DETAIL
        }
        else -> {
            ...
            contentType = ReplyContentType.LIST_ONLY
        }
    }
...
接下来,根据 contentType 在 ReplyAppContent 中选择不同布局分支。
• 在 ReplyHomeScreen.kt 中,为 ReplyHomeScreen 可组合项增加 contentType 参数。
ReplyHomeScreen.kt
...
@OptIn(ExperimentalMaterial3Api::class)
@Composable
fun ReplyHomeScreen(
    navigationType: ReplyNavigationType,
    contentType: ReplyContentType,
    replyUiState: ReplyUiState,
    onTabPressed: (MailboxType) -> Unit,
    onEmailCardPressed: (Email) -> Unit,
    onDetailScreenBackPressed: () -> Unit,
    modifier: Modifier = Modifier
) {
...
• 把 contentType 传入 ReplyHomeScreen。
ReplyApp.kt
...
    ReplyHomeScreen(
        navigationType = navigationType,
        contentType = contentType,
        replyUiState = replyUiState,
        onTabPressed = { mailboxType: MailboxType ->
            viewModel.updateCurrentMailbox(mailboxType = mailboxType)
            viewModel.resetHomeScreenStates()
        },
        onEmailCardPressed = { email: Email ->
            viewModel.updateDetailsScreenStates(
                email = email
            )
        },
        onDetailScreenBackPressed = {
            viewModel.resetHomeScreenStates()
        },
        modifier = modifier
    )

...
• 为 ReplyAppContent 增加 contentType 参数。
ReplyHomeScreen.kt
...
@Composable
private fun ReplyAppContent(
    navigationType: ReplyNavigationType,
    contentType: ReplyContentType,
    replyUiState: ReplyUiState,
    onTabPressed: ((MailboxType) -> Unit),
    onEmailCardPressed: (Email) -> Unit,
    navigationItemContentList: List<NavigationItemContent>,
    modifier: Modifier = Modifier
) {
...
• 把该值传给两个 ReplyAppContent 调用。
ReplyHomeScreen.kt
...
            ReplyAppContent(
                navigationType = navigationType,
                contentType = contentType,
                replyUiState = replyUiState,
                onTabPressed = onTabPressed,
                onEmailCardPressed = onEmailCardPressed,
                navigationItemContentList = navigationItemContentList,
                modifier = modifier
            )
        }
    } else {
        if (replyUiState.isShowingHomepage) {
            ReplyAppContent(
                navigationType = navigationType,
                contentType = contentType,
                replyUiState = replyUiState,
                onTabPressed = onTabPressed,
                onEmailCardPressed = onEmailCardPressed,
                navigationItemContentList = navigationItemContentList,
                modifier = modifier
            )
        } else {
            ReplyDetailsScreen(
                replyUiState = replyUiState,
                isFullScreen = true,
                onBackButtonClicked = onDetailScreenBackPressed,
                modifier = modifier
            )
        }
    }
...
当 contentType 为 LIST_AND_DETAIL 时,同时显示列表和详情;为 LIST_ONLY 时,仅显示邮件列表内容。
• 在 ReplyHomeScreen.kt 的 ReplyAppContent 中添加 if/else。若为 LIST_AND_DETAIL,显示 ReplyListAndDetailContent;否则显示 ReplyListOnlyContent。
ReplyHomeScreen.kt
...
        Column(
            modifier = modifier
                .fillMaxSize()
                .background(MaterialTheme.colorScheme.inverseOnSurface)
        ) {
            if (contentType == ReplyContentType.LIST_AND_DETAIL) {
                ReplyListAndDetailContent(
                    replyUiState = replyUiState,
                    onEmailCardPressed = onEmailCardPressed,
                    modifier = Modifier.weight(1f)
                )
            } else {
                ReplyListOnlyContent(
                    replyUiState = replyUiState,
                    onEmailCardPressed = onEmailCardPressed,
                    modifier = Modifier.weight(1f)
                        .padding(
                            horizontal = dimensionResource(R.dimen.email_list_only_horizontal_padding)
                        )
                )
            }
            AnimatedVisibility(visible = navigationType == ReplyNavigationType.BOTTOM_NAVIGATION) {
                ReplyBottomNavigationBar(
                    currentTab = replyUiState.currentMailbox,
                    onTabPressed = onTabPressed,
                    navigationItemContentList = navigationItemContentList
                )
            }
        }
...
• 移除用于显示常驻导航抽屉的 replyUiState.isShowingHomepage 条件,因为扩展视图中的用户不需要再导航到独立详情页。
ReplyHomeScreen.kt
...
    if (navigationType == ReplyNavigationType.PERMANENT_NAVIGATION_DRAWER) {
        PermanentNavigationDrawer(
            drawerContent = {
                PermanentDrawerSheet(Modifier.width(dimensionResource(R.dimen.drawer_width))) {
                    NavigationDrawerContent(
                        selectedDestination = replyUiState.currentMailbox,
                        onTabPressed = onTabPressed,
                        navigationItemContentList = navigationItemContentList,
                        modifier = Modifier
                            .wrapContentWidth()
                            .fillMaxHeight()
                            .background(MaterialTheme.colorScheme.inverseOnSurface)
                            .padding(dimensionResource(R.dimen.drawer_padding_content))
                    )
                }
            }
        ) {

...
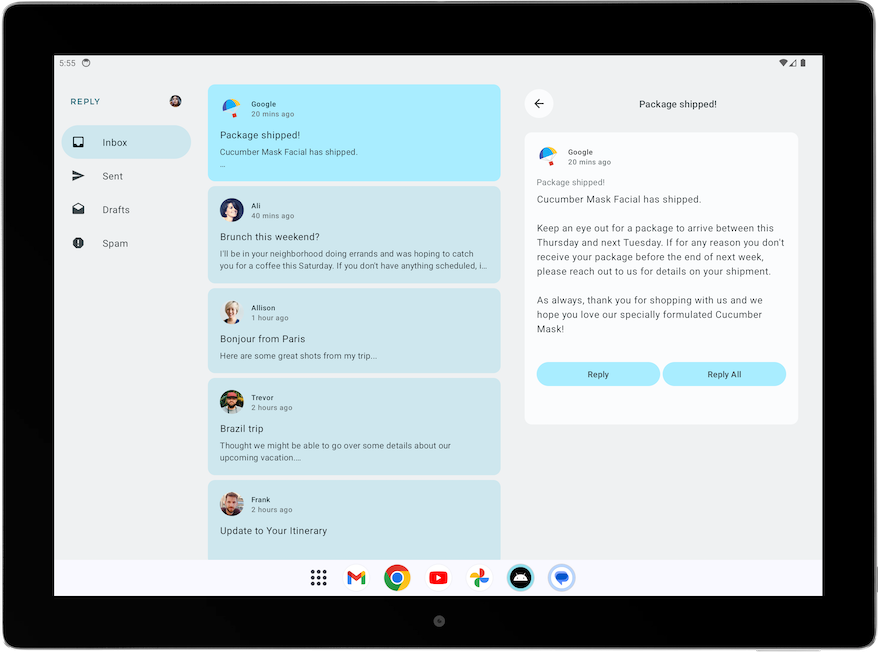
• 在平板模式运行应用,应看到以下界面:
改善列表—详情视图的界面元素
目前,扩展屏幕的主界面已经显示详情面板。
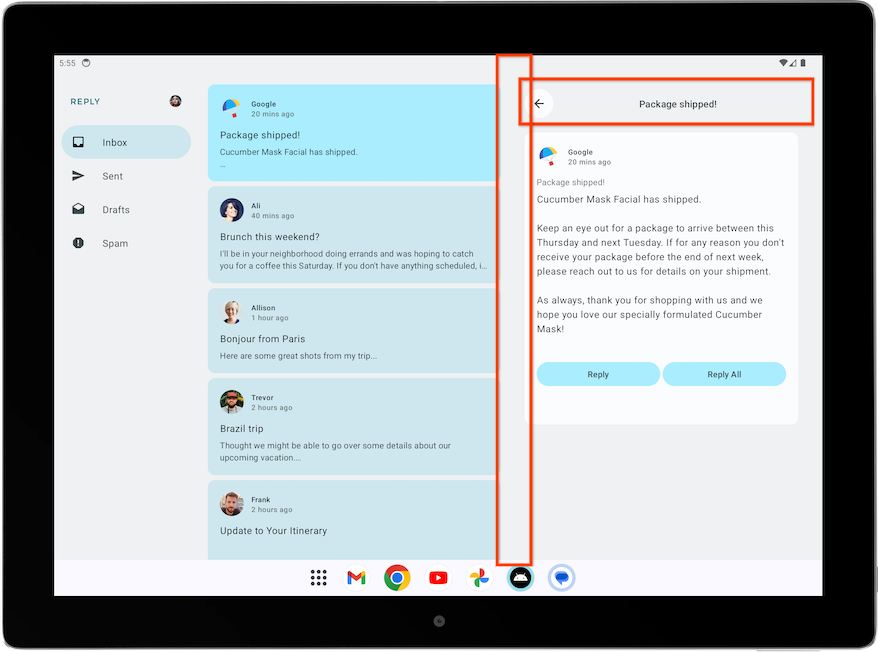
但详情内容最初为独立页面设计,其中返回按钮、主题标题和额外内边距在这里显得多余。可以做些简单调整。
按以下步骤改善扩展视图:
• 在 ReplyDetailsScreen.kt 中,为 ReplyDetailsScreen 增加布尔参数 isFullScreen。
该参数用来区分可组合项是独立显示,还是嵌入主界面。
ReplyDetailsScreen.kt
...
@Composable
fun ReplyDetailsScreen(
    replyUiState: ReplyUiState,
    onBackPressed: () -> Unit,
    modifier: Modifier = Modifier,
    isFullScreen: Boolean = false
) {
...
• 在 ReplyDetailsScreen 内,用 if 包裹 ReplyDetailsScreenTopBar,只在全屏显示时呈现顶栏。
ReplyDetailsScreen.kt
...
    LazyColumn(
        modifier = modifier
            .fillMaxSize()
            .background(color = MaterialTheme.colorScheme.inverseOnSurface)
            .padding(top = dimensionResource(R.dimen.detail_card_list_padding_top))
    ) {
        item {
            if (isFullScreen) {
                ReplyDetailsScreenTopBar(
                    onBackPressed,
                    replyUiState,
                    Modifier
                        .fillMaxWidth()
                        .padding(bottom = dimensionResource(R.dimen.detail_topbar_padding_bottom))
                    )
                )
            }

...接下来调整内边距。ReplyEmailDetailsCard 所需内边距随是否全屏而变化;在扩展屏幕中与其他可组合项一起显示时,其他可组合项已经提供了部分内边距。
• 向 ReplyEmailDetailsCard 传入 isFullScreen。全屏时传入水平内边距为 R.dimen.detail_card_outer_padding_horizontal 的修饰符,否则只给末端设置这一内边距。
ReplyDetailsScreen.kt
...
        item {
            if (isFullScreen) {
                ReplyDetailsScreenTopBar(
                    onBackPressed,
                    replyUiState,
                    Modifier
                        .fillMaxWidth()
                        .padding(bottom = dimensionResource(R.dimen.detail_topbar_padding_bottom))
                    )
                )
            }
            ReplyEmailDetailsCard(
                email = replyUiState.currentSelectedEmail,
                mailboxType = replyUiState.currentMailbox,
                isFullScreen = isFullScreen,
                modifier = if (isFullScreen) {
                    Modifier.padding(horizontal = dimensionResource(R.dimen.detail_card_outer_padding_horizontal))
                } else {
                    Modifier.padding(end = dimensionResource(R.dimen.detail_card_outer_padding_horizontal))
                }
            )
        }
...
• 为 ReplyEmailDetailsCard 增加 isFullScreen 参数。
ReplyDetailsScreen.kt
...
@OptIn(ExperimentalMaterial3Api::class)
@Composable
private fun ReplyEmailDetailsCard(
    email: Email,
    mailboxType: MailboxType,
    modifier: Modifier = Modifier,
    isFullScreen: Boolean = false
) {
...
• 在 ReplyEmailDetailsCard 内,仅在非全屏时显示邮件主题,因为全屏布局的标题栏已有主题。全屏时添加高度为 R.dimen.detail_content_padding_top 的间隔。
ReplyDetailsScreen.kt
...
Column(
    modifier = Modifier
        .fillMaxWidth()
        .padding(dimensionResource(R.dimen.detail_card_inner_padding))
) {
    DetailsScreenHeader(
        email,
        Modifier.fillMaxWidth()
    )
    if (isFullScreen) {
        Spacer(modifier = Modifier.height(dimensionResource(R.dimen.detail_content_padding_top)))
    } else {
        Text(
            text = stringResource(email.subject),
            style = MaterialTheme.typography.bodyMedium,
            color = MaterialTheme.colorScheme.outline,
            modifier = Modifier.padding(
                top = dimensionResource(R.dimen.detail_content_padding_top),
                bottom = dimensionResource(R.dimen.detail_expanded_subject_body_spacing)
            ),
        )
    }
    Text(
        text = stringResource(email.body),
        style = MaterialTheme.typography.bodyLarge,
        color = MaterialTheme.colorScheme.onSurfaceVariant,
    )
    DetailsScreenButtonBar(mailboxType, displayToast)
}

...
• 在 ReplyHomeScreen.kt 的 ReplyHomeScreen 中,独立创建 ReplyDetailsScreen 时,把 isFullScreen 设为 true。
ReplyHomeScreen.kt
...
        } else {
            ReplyDetailsScreen(
                replyUiState = replyUiState,
                isFullScreen = true,
                onBackPressed = onDetailScreenBackPressed,
                modifier = modifier
            )
        }
...
• 在平板模式运行,查看以下布局:
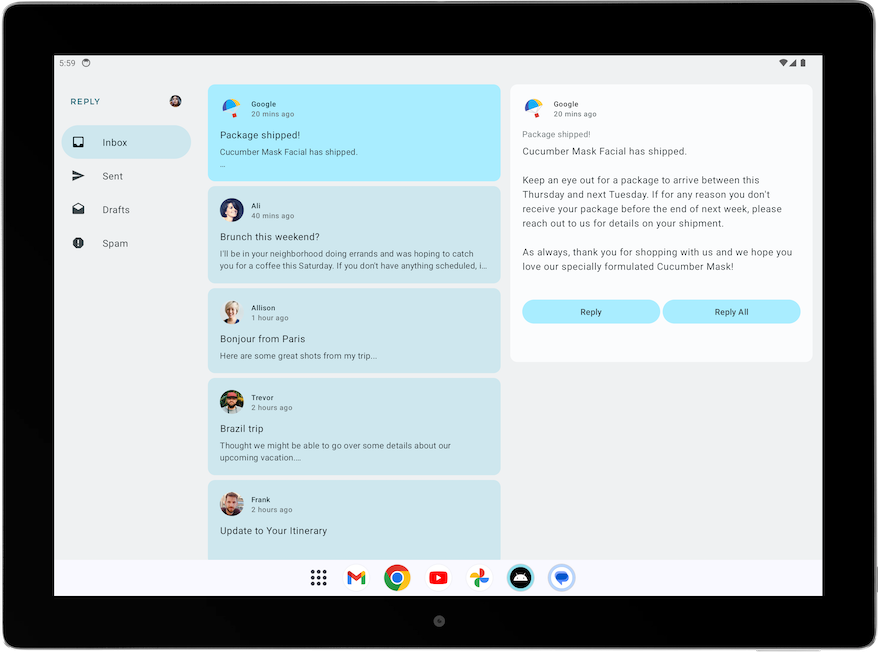
调整列表—详情视图的返回行为
扩展屏幕不需要导航到单独的 ReplyDetailsScreen。用户按返回按钮时,应关闭应用,因此需要调整返回处理。
在 ReplyListAndDetailContent 内,向 ReplyDetailsScreen 的 onBackPressed 传入 activity.finish()。
ReplyHomeContent.kt
...
import android.app.Activity
import androidx.compose.ui.platform.LocalContext
...
        val activity = LocalContext.current as Activity
        ReplyDetailsScreen(
            replyUiState = replyUiState,
            modifier = Modifier.weight(1f),
            onBackPressed = { activity.finish() }
        )
...
4. 验证不同屏幕尺寸
大屏幕应用质量指南
为了向 Android 用户提供出色且一致的体验,构建与测试时应考虑质量。可以参考核心应用质量指南,确定改进方向。
要为各种设备形态提供高质量应用,请阅读大屏幕应用质量指南。应用还必须满足第3级“大屏幕就绪”的要求。
手动测试大屏幕适配情况
质量指南提供了测试设备建议和检查流程。下面来看与 Reply 相关的一个例子。
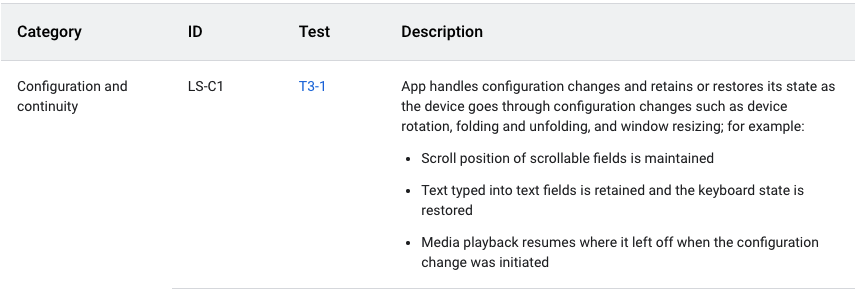
上图要求应用在配置变更后保留或恢复状态,并提供了如下测试步骤。
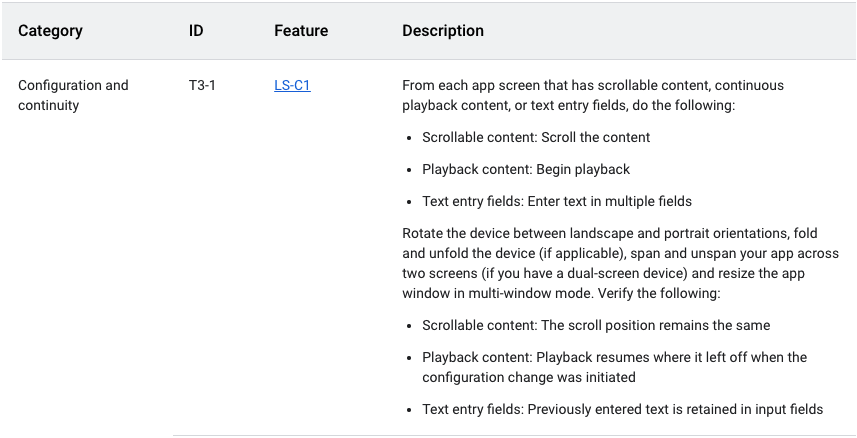
手动测试 Reply 的配置连续性:
• 在中等尺寸设备运行 Reply;如果使用可调整大小的模拟器,选择展开的折叠屏模式。
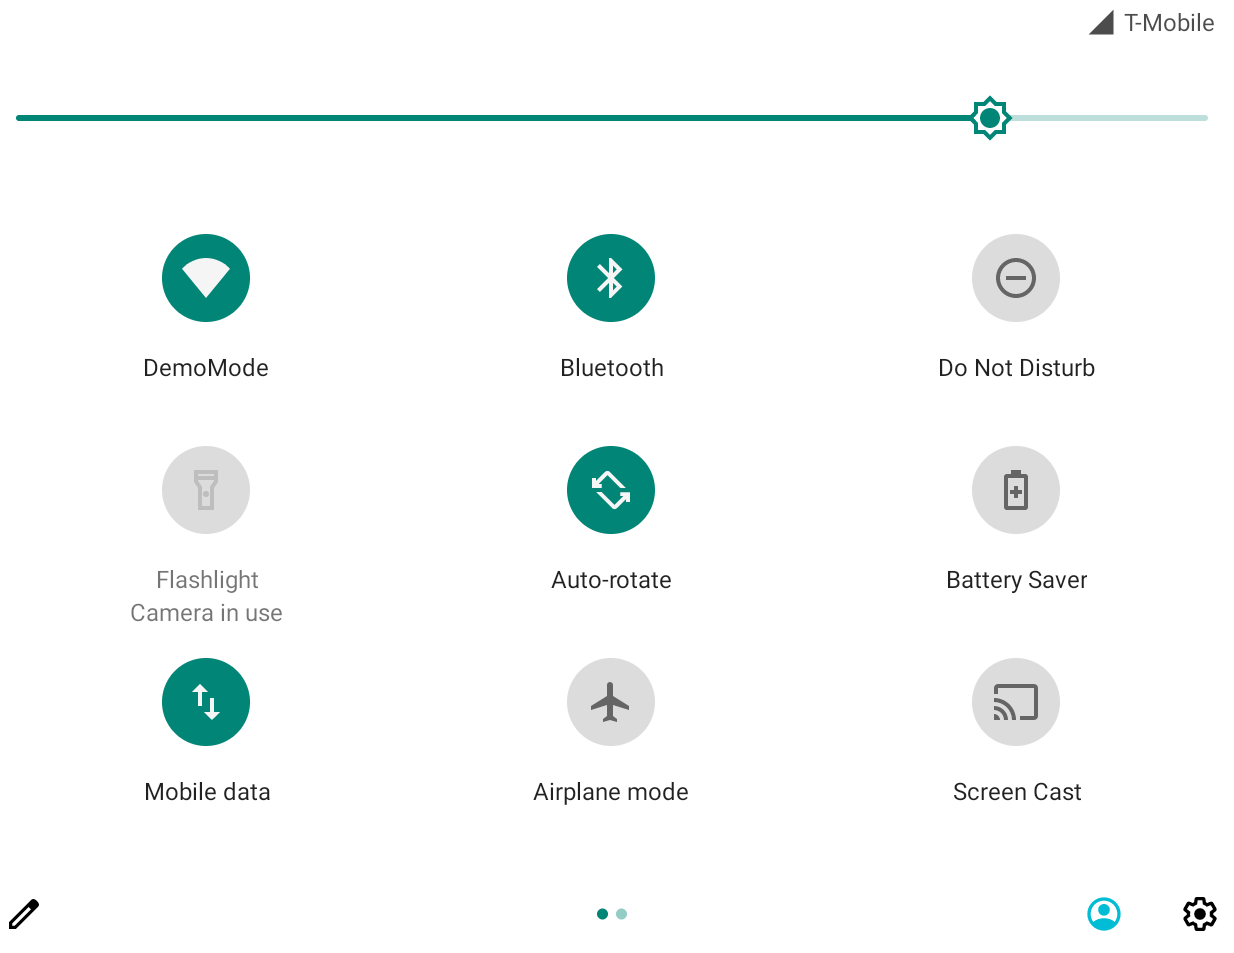
• 确保模拟器启用了 Auto rotate(自动旋转)。
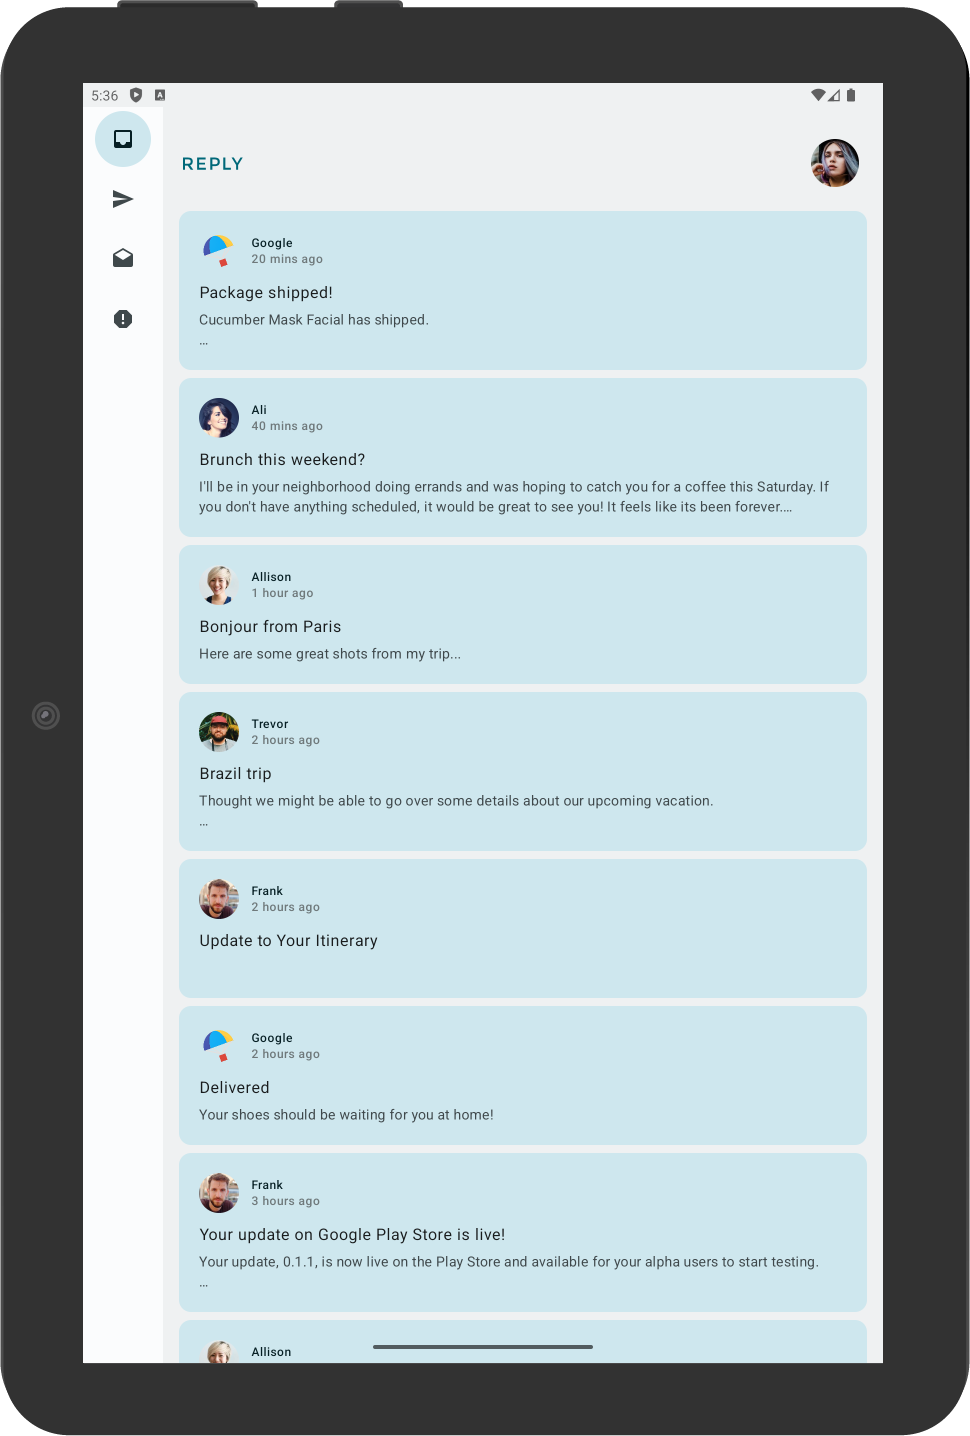
• 向下滚动邮件列表。
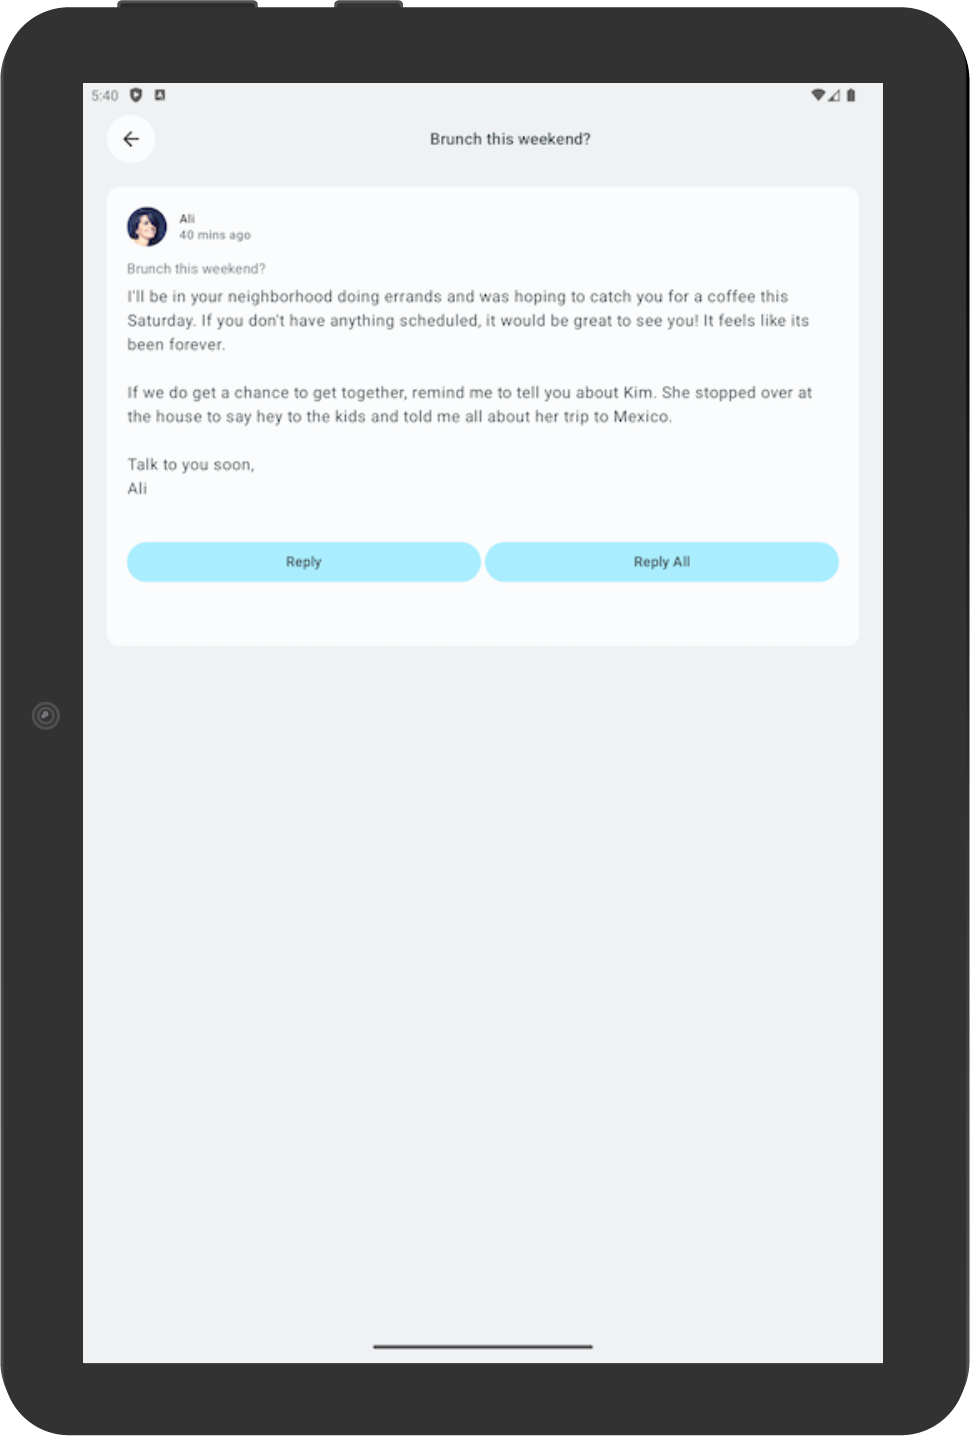
• 点击邮件卡片,例如打开 Ali 的邮件。
• 旋转设备,确认选中的邮件与竖屏时一致。此例中仍应显示 Ali 的邮件。
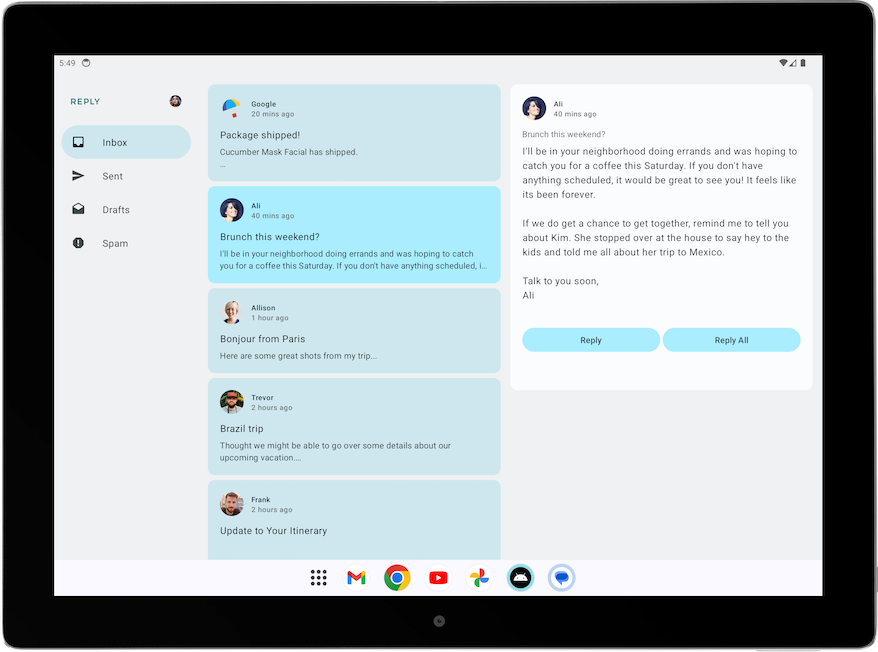
• 转回竖屏,确认仍显示同一封邮件。
5. 为自适应应用添加自动化测试
配置紧凑屏幕测试
“测试 Cupcake 应用”练习介绍了界面测试。现在学习为不同屏幕尺寸编写专门的测试。
Reply 在不同尺寸中使用不同导航元素,例如扩展屏幕应显示常驻导航抽屉。针对各屏幕尺寸验证底部导航、导航栏和导航抽屉是否存在,是很有用的测试。
创建测试,验证紧凑屏幕中的底部导航:
• 在测试目录创建 Kotlin 类 ReplyAppTest.kt。
• 在 ReplyAppTest 中使用 createAndroidComposeRule 创建测试规则,类型参数传入 ComponentActivity,以访问空 Activity,而非 MainActivity。
ReplyAppTest.kt
...
class ReplyAppTest {

    @get:Rule
    val composeTestRule = createAndroidComposeRule<ComponentActivity>()
...
为了区分不同导航元素,为 ReplyBottomNavigationBar 添加 testTag。
• 为底部导航定义字符串资源。
strings.xml
...
<resources>
...
    <string name="navigation_bottom">Navigation Bottom</string>
...
</resources>
• 在 ReplyBottomNavigationBar 中,通过 Modifier.testTag 把该字符串用作测试标签。
ReplyHomeScreen.kt
...
val bottomNavigationContentDescription = stringResource(R.string.navigation_bottom)
ReplyBottomNavigationBar(
    ...
    modifier = Modifier
        .fillMaxWidth()
        .testTag(bottomNavigationContentDescription)
)
...
• 在 ReplyAppTest 创建紧凑屏幕测试函数。将 composeTestRule 的内容设置为 ReplyApp,并把 WindowWidthSizeClass.Compact 传给 windowSize。
> 让可组合项接收 WindowWidthSizeClass 参数,是提高代码可测试性的良好做法。
ReplyAppTest.kt
...
    @Test
    fun compactDevice_verifyUsingBottomNavigation() {
        // Set up compact window
        composeTestRule.setContent {
            ReplyApp(
                windowSize = WindowWidthSizeClass.Compact
            )
        }
    }
• 使用测试标签断言底部导航存在:在 composeTestRule 上调用扩展函数 onNodeWithTagForStringId,传入底部导航字符串,再调用 assertExists()。
ReplyAppTest.kt
...
    @Test
    fun compactDevice_verifyUsingBottomNavigation() {
        // Set up compact window
        composeTestRule.setContent {
            ReplyApp(
                windowSize = WindowWidthSizeClass.Compact
            )
        }
        // Bottom navigation is displayed
        composeTestRule.onNodeWithTagForStringId(
            R.string.navigation_bottom
        ).assertExists()
    }
• 运行测试并验证通过。
配置中等和扩展屏幕测试
紧凑屏幕测试完成后,再为中等和扩展屏幕创建对应测试。
验证中等屏幕的导航栏与扩展屏幕的常驻导航抽屉:
• 为导航栏定义字符串资源,稍后作为测试标签。
strings.xml
...
<resources>
...
    <string name="navigation_rail">Navigation Rail</string>
...
</resources>
• 在 PermanentNavigationDrawer 中,通过 Modifier 传入对应字符串作为测试标签。
ReplyHomeScreen.kt
...
    val navigationDrawerContentDescription = stringResource(R.string.navigation_drawer)
        PermanentNavigationDrawer(
...
modifier = Modifier.testTag(navigationDrawerContentDescription)
)
...
• 在 ReplyNavigationRail 中,通过 Modifier 传入对应测试标签。
ReplyHomeScreen.kt
...
val navigationRailContentDescription = stringResource(R.string.navigation_rail)
ReplyNavigationRail(
    ...
    modifier = Modifier
        .testTag(navigationRailContentDescription)
)
...
• 添加测试,验证中等屏幕存在导航栏。
ReplyAppTest.kt
...
@Test
fun mediumDevice_verifyUsingNavigationRail() {
    // Set up medium window
    composeTestRule.setContent {
        ReplyApp(
            windowSize = WindowWidthSizeClass.Medium
        )
    }
    // Navigation rail is displayed
    composeTestRule.onNodeWithTagForStringId(
        R.string.navigation_rail
    ).assertExists()
}
• 添加测试,验证扩展屏幕存在导航抽屉。
ReplyAppTest.kt
...
@Test
fun expandedDevice_verifyUsingNavigationDrawer() {
    // Set up expanded window
    composeTestRule.setContent {
        ReplyApp(
            windowSize = WindowWidthSizeClass.Expanded
        )
    }
    // Navigation drawer is displayed
    composeTestRule.onNodeWithTagForStringId(
        R.string.navigation_drawer
    ).assertExists()
}
• 使用平板模拟器,或将可调整大小的模拟器设为 Tablet 模式。
• 运行全部测试并验证通过。
测试紧凑屏幕中的配置变更
配置变更在应用生命周期中很常见,例如从竖屏旋转到横屏。应测试变更之后应用能否保留状态。接下来模拟配置变更,验证紧凑屏幕中的状态保留。
操作如下:
• 在测试目录创建 ReplyAppStateRestorationTest.kt。
• 使用 createAndroidComposeRule 创建测试规则,传入类型参数 ComponentActivity。
ReplyAppStateRestorationTest.kt
...
class ReplyAppStateRestorationTest {

    /**
     * Note: To access to an empty activity, the code uses ComponentActivity instead of
     * MainActivity.
     */
    @get:Rule
    val composeTestRule = createAndroidComposeRule<ComponentActivity>()
}
...
• 创建测试函数,验证配置变更后仍选中原来的邮件。
ReplyAppStateRestorationTest.kt
...
@Test
fun compactDevice_selectedEmailEmailRetained_afterConfigChange() {

}
...
测试配置变更需要使用 StateRestorationTester。
• 把 composeTestRule 传给 StateRestorationTester,创建 stateRestorationTester。
• 使用 setContent() 显示 ReplyApp,将 WindowWidthSizeClass.Compact 传给 windowSize。
ReplyAppStateRestorationTest.kt
...
@Test
fun compactDevice_selectedEmailEmailRetained_afterConfigChange() {
    // Setup compact window
    val stateRestorationTester = StateRestorationTester(composeTestRule)
    stateRestorationTester.setContent { ReplyApp(windowSize = WindowWidthSizeClass.Compact) }

}
...
• 查找第三封邮件的文本,并用 assertIsDisplayed() 验证它在应用中显示。
ReplyAppStateRestorationTest.kt
...
@Test
fun compactDevice_selectedEmailEmailRetained_afterConfigChange() {
    // Setup compact window
    val stateRestorationTester = StateRestorationTester(composeTestRule)
    stateRestorationTester.setContent { ReplyApp(windowSize = WindowWidthSizeClass.Compact) }

    // Given third email is displayed
    composeTestRule.onNodeWithText(
        composeTestRule.activity.getString(LocalEmailsDataProvider.allEmails[2].body)
    ).assertIsDisplayed()
}
...
• 使用 performClick() 点击邮件主题,进入详情界面。
ReplyAppStateRestorationTest.kt
...
@Test
fun compactDevice_selectedEmailEmailRetained_afterConfigChange() {
    // Setup compact window
    val stateRestorationTester = StateRestorationTester(composeTestRule)
    stateRestorationTester.setContent { ReplyApp(windowSize = WindowWidthSizeClass.Compact) }

    // Given third email is displayed
    composeTestRule.onNodeWithText(
        composeTestRule.activity.getString(LocalEmailsDataProvider.allEmails[2].body)
    ).assertIsDisplayed()

    // Open detailed page
    composeTestRule.onNodeWithText(
        composeTestRule.activity.getString(LocalEmailsDataProvider.allEmails[2].subject)
    ).performClick()
}
...
• 验证第三封邮件在详情界面显示。断言返回按钮存在,以确认当前为详情界面;然后验证第三封邮件的文本。
ReplyAppStateRestorationTest.kt
...
@Test
fun compactDevice_selectedEmailEmailRetained_afterConfigChange() {
    ...
    // Open detailed page
    composeTestRule.onNodeWithText(
        composeTestRule.activity.getString(LocalEmailsDataProvider.allEmails[2].subject)
    ).performClick()

    // Verify that it shows the detailed screen for the correct email
    composeTestRule.onNodeWithContentDescriptionForStringId(
        R.string.navigation_back
    ).assertExists()
    composeTestRule.onNodeWithText(
}
...
• 使用 stateRestorationTester.emulateSavedInstanceStateRestore() 模拟配置变更。
ReplyAppStateRestorationTest.kt
...
@Test
fun compactDevice_selectedEmailEmailRetained_afterConfigChange() {
    ...
    // Verify that it shows the detailed screen for the correct email
    composeTestRule.onNodeWithContentDescriptionForStringId(
        R.string.navigation_back
    ).assertExists()
    composeTestRule.onNodeWithText(
        composeTestRule.activity.getString(LocalEmailsDataProvider.allEmails[2].body)
    ).assertExists()
    // Simulate a config change
    stateRestorationTester.emulateSavedInstanceStateRestore()
}
...
• 再次验证第三封邮件显示在详情界面:确认返回按钮存在,并检查邮件文本。
ReplyAppStateRestorationTest.kt
...
@Test
fun compactDevice_selectedEmailEmailRetained_afterConfigChange() {
    // Setup compact window
    val stateRestorationTester = StateRestorationTester(composeTestRule)
    stateRestorationTester.setContent { ReplyApp(windowSize = WindowWidthSizeClass.Compact) }

    // Given third email is displayed
    composeTestRule.onNodeWithText(
        composeTestRule.activity.getString(LocalEmailsDataProvider.allEmails[2].body)
    ).assertIsDisplayed()

    // Open detailed page
    composeTestRule.onNodeWithText(
        composeTestRule.activity.getString(LocalEmailsDataProvider.allEmails[2].subject)
    ).performClick()

    // Verify that it shows the detailed screen for the correct email
    composeTestRule.onNodeWithContentDescriptionForStringId(
        R.string.navigation_back
    ).assertExists()
    composeTestRule.onNodeWithText(
        composeTestRule.activity.getString(LocalEmailsDataProvider.allEmails[2].body)
    ).assertExists()

    // Simulate a config change
    stateRestorationTester.emulateSavedInstanceStateRestore()

    // Verify that it still shows the detailed screen for the same email
    composeTestRule.onNodeWithContentDescriptionForStringId(
        R.string.navigation_back
    ).assertExists()
    composeTestRule.onNodeWithText(
        composeTestRule.activity.getString(LocalEmailsDataProvider.allEmails[2].body)
    ).assertExists()
}

...
• 使用手机模拟器,或将可调整大小的模拟器设为 Phone 模式。
• 运行并验证测试通过。
测试扩展屏幕中的配置变更
传入适当的 WindowWidthSizeClass,并模拟配置变更,测试扩展屏幕:
• 创建测试函数,验证配置变更后详情界面仍选中同一封邮件。
ReplyAppStateRestorationTest.kt
...
@Test
fun expandedDevice_selectedEmailEmailRetained_afterConfigChange() {

}
...
这里同样需要使用 StateRestorationTester。
• 把 composeTestRule 传入 StateRestorationTester,创建 stateRestorationTester。
• 使用 setContent() 显示 ReplyApp,向 windowSize 传入 WindowWidthSizeClass.Expanded。
ReplyAppStateRestorationTest.kt
...
@Test
fun expandedDevice_selectedEmailEmailRetained_afterConfigChange() {
    // Setup expanded window
    val stateRestorationTester = StateRestorationTester(composeTestRule)
    stateRestorationTester.setContent { ReplyApp(windowSize = WindowWidthSizeClass.Expanded) }
}
...
• 查找第三封邮件的文本,使用 assertIsDisplayed() 验证其显示。
ReplyAppStateRestorationTest.kt
...
@Test
fun expandedDevice_selectedEmailEmailRetained_afterConfigChange() {
    // Setup expanded window
    val stateRestorationTester = StateRestorationTester(composeTestRule)
    stateRestorationTester.setContent { ReplyApp(windowSize = WindowWidthSizeClass.Expanded) }

    // Given third email is displayed
    composeTestRule.onNodeWithText(
        composeTestRule.activity.getString(LocalEmailsDataProvider.allEmails[2].body)
    ).assertIsDisplayed()
}
...
• 使用 performClick() 选中第三封邮件,在详情中显示。
ReplyAppStateRestorationTest.kt
...
@Test
fun expandedDevice_selectedEmailEmailRetained_afterConfigChange() {
    // Setup expanded window
    val stateRestorationTester = StateRestorationTester(composeTestRule)
    stateRestorationTester.setContent { ReplyApp(windowSize = WindowWidthSizeClass.Expanded) }

    // Given third email is displayed
    composeTestRule.onNodeWithText(
        composeTestRule.activity.getString(LocalEmailsDataProvider.allEmails[2].body)
    ).assertIsDisplayed()

    // Select third email
    composeTestRule.onNodeWithText(
        composeTestRule.activity.getString(LocalEmailsDataProvider.allEmails[2].subject)
    ).performClick()
    ...
}

...
• 通过详情界面的 testTag 查找其子节点中的文本,验证第三封邮件。这样能确保匹配的是详情区域,而不是邮件列表。
ReplyAppStateRestorationTest.kt
...

@Test
fun expandedDevice_selectedEmailEmailRetained_afterConfigChange() {
    ...
    // Select third email
    composeTestRule.onNodeWithText(
        composeTestRule.activity.getString(LocalEmailsDataProvider.allEmails[2].subject)
    ).performClick()

    // Verify that third email is displayed on the details screen
    composeTestRule.onNodeWithTagForStringId(R.string.details_screen).onChildren()
        .assertAny(hasAnyDescendant(hasText(
            composeTestRule.activity.getString(LocalEmailsDataProvider.allEmails[2].body)))
        )
...
}

...
• 使用 stateRestorationTester.emulateSavedInstanceStateRestore() 模拟配置变更。
ReplyAppStateRestorationTest.kt
...
@Test
fun expandedDevice_selectedEmailEmailRetained_afterConfigChange() {
    ...
    // Verify that third email is displayed on the details screen
    composeTestRule.onNodeWithTagForStringId(R.string.details_screen).onChildren()
        .assertAny(hasAnyDescendant(hasText(
            composeTestRule.activity.getString(LocalEmailsDataProvider.allEmails[2].body)))
        )

    // Simulate a config change
    stateRestorationTester.emulateSavedInstanceStateRestore()
    ...
}
...
• 再次验证配置变更后详情界面仍显示第三封邮件。
ReplyAppStateRestorationTest.kt
...
@Test
fun expandedDevice_selectedEmailEmailRetained_afterConfigChange() {
    // Setup expanded window
    val stateRestorationTester = StateRestorationTester(composeTestRule)
    stateRestorationTester.setContent { ReplyApp(windowSize = WindowWidthSizeClass.Expanded) }

    // Given third email is displayed
    composeTestRule.onNodeWithText(
        composeTestRule.activity.getString(LocalEmailsDataProvider.allEmails[2].body)
    ).assertIsDisplayed()

    // Select third email
    composeTestRule.onNodeWithText(
        composeTestRule.activity.getString(LocalEmailsDataProvider.allEmails[2].subject)
    ).performClick()

    // Verify that third email is displayed on the details screen
    composeTestRule.onNodeWithTagForStringId(R.string.details_screen).onChildren()
        .assertAny(hasAnyDescendant(hasText(
            composeTestRule.activity.getString(LocalEmailsDataProvider.allEmails[2].body)))
        )

    // Simulate a config change
    stateRestorationTester.emulateSavedInstanceStateRestore()

    // Verify that third email is still displayed on the details screen
    composeTestRule.onNodeWithTagForStringId(R.string.details_screen).onChildren()
        .assertAny(hasAnyDescendant(hasText(
            composeTestRule.activity.getString(LocalEmailsDataProvider.allEmails[2].body)))
        )
}
...
• 使用平板模拟器,或将可调整大小的模拟器设为 Tablet 模式。
• 运行并验证测试通过。
使用注解按屏幕尺寸对测试分组
你可能发现,部分测试在不兼容的屏幕尺寸上会失败。逐一选择设备运行测试虽然可行,但测试数量增加后不易扩展。
可以创建注解,标记测试适用的屏幕尺寸,再配置它们在对应设备上运行。
按屏幕尺寸运行测试:
• 在测试目录创建 TestAnnotations.kt,包含 TestCompactWidth、TestMediumWidth、TestExpandedWidth 三个注解类。
TestAnnotations.kt
...
annotation class TestCompactWidth
annotation class TestMediumWidth
annotation class TestExpandedWidth
...
• 在 ReplyAppTest 和 ReplyAppStateRestorationTest 的紧凑屏幕测试函数上,在测试注解之后添加 TestCompactWidth。
ReplyAppTest.kt
...
    @Test
    @TestCompactWidth
    fun compactDevice_verifyUsingBottomNavigation() {
...
ReplyAppStateRestorationTest.kt
...
    @Test
    @TestCompactWidth
    fun compactDevice_selectedEmailEmailRetained_afterConfigChange() {

...
• 在 ReplyAppTest 的中等屏幕测试函数上,在测试注解之后添加 TestMediumWidth。
ReplyAppTest.kt
...
    @Test
    @TestMediumWidth
    fun mediumDevice_verifyUsingNavigationRail() {
...
• 在 ReplyAppTest 和 ReplyAppStateRestorationTest 的扩展屏幕测试函数上,在测试注解之后添加 TestExpandedWidth。
ReplyAppTest.kt
...
    @Test
    @TestExpandedWidth
    fun expandedDevice_verifyUsingNavigationDrawer() {
...
ReplyAppStateRestorationTest.kt
...
    @Test
    @TestExpandedWidth
    fun expandedDevice_selectedEmailEmailRetained_afterConfigChange() {
...
接着配置运行项,使其只运行标记 TestCompactWidth 的测试。
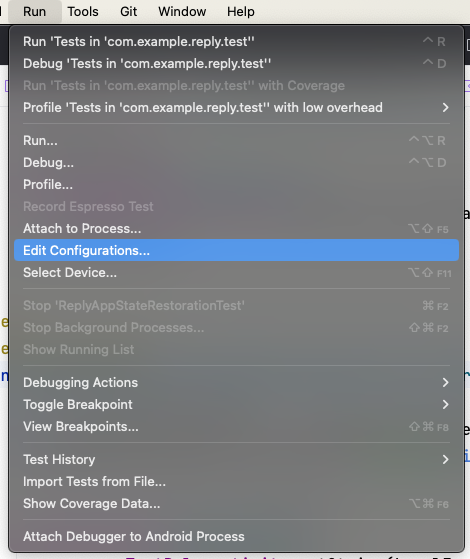
• 在 Android Studio 选择 Run > Edit Configurations…。
• 把测试配置重命名为 Compact tests,并选择 All in Package。
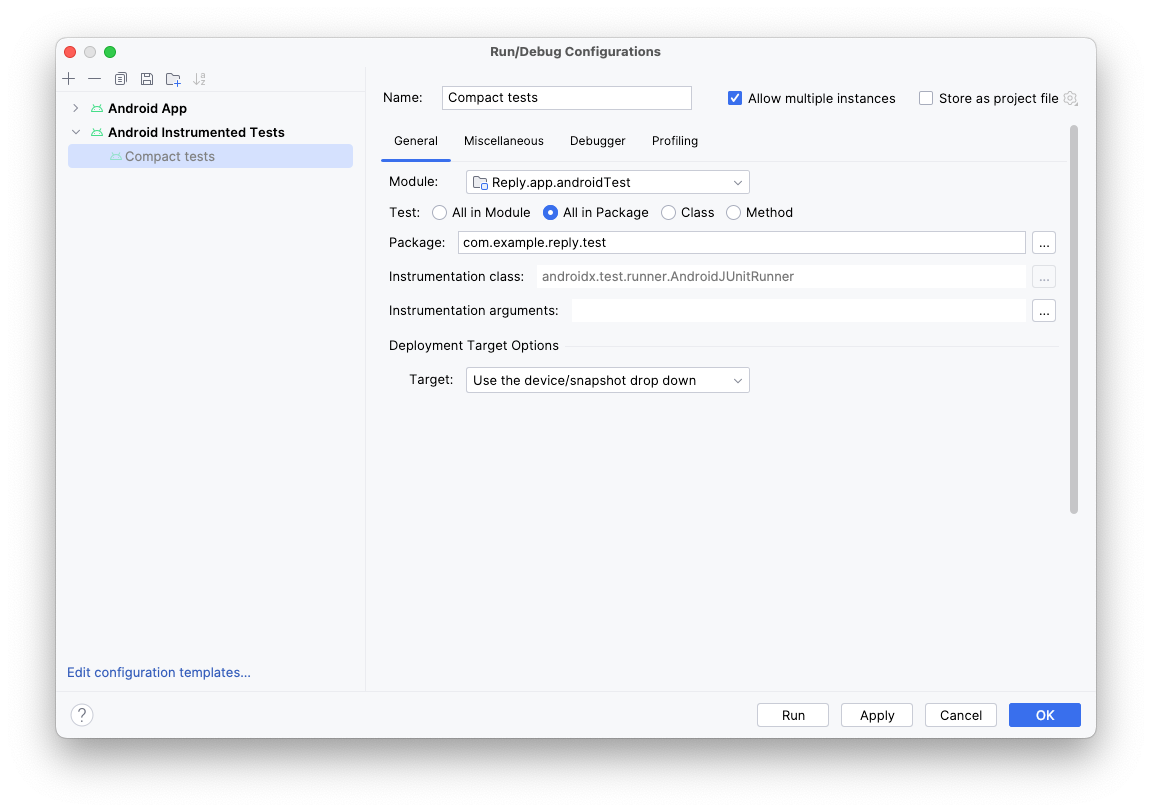
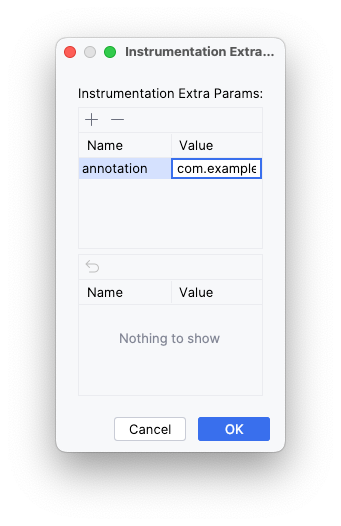
• 点击 Instrumentation arguments 右侧的省略号(…)。
• 点击加号(+),添加参数 annotation,值为 com.example.reply.test.TestCompactWidth。
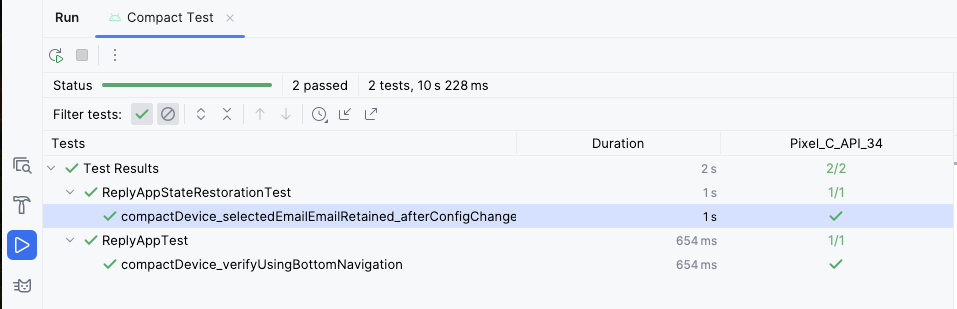
• 使用紧凑屏幕模拟器运行测试。
• 确认只运行了紧凑屏幕测试。
• 对中等和扩展屏幕重复上述步骤。
6. 获取参考答案代码
运行以下 Git 命令,下载完成后的代码:
$ git clone https://github.com/google-developer-training/basic-android-kotlin-compose-training-reply-app.git也可以下载仓库 ZIP,解压后在 Android Studio 中打开。
> 参考答案代码位于仓库的 main 分支。
也可直接在 GitHub 查看。
7. 结语
完成这些步骤后,Reply 就通过自适应布局支持各种屏幕尺寸。你还学习了用预览加快开发,并通过不同测试方法维持应用质量。
可以在社交媒体使用 #AndroidBasics 分享成果。
深入学习
• 构建自适应布局
• 支持不同显示尺寸
• 大屏幕设计
来源:Build an app with an adaptive layout,Android Developers。除另有说明外,正文按 CC BY 4.0 授权;代码示例按 Apache 2.0 授权。本文对原文进行了中文翻译。详见 Google Developers 网站政策。Java 是 Oracle 及其关联公司的注册商标。











暂无评论内容